This help article is related to the Production Accounting Suite (PAS)
In Wrapbook, production accountants and administrators can manage AP invoices using either the Production Accounting Suite or Cost tracking. To understand the differences, click here.
Adding AP invoices in PAS is permission based
To add AP invoices, your account must have one of the following roles enabled:
Role: Company Admin, Accountant
Custom role with: Accounting & Cost Tracking / AP invoices - Full access, Create and manage
How to add an AP invoice in Wrapbook
With PAS enabled, you can add accounts payable (AP) invoices by:
Whenever possible, we recommend using the project’s AP Inbox, as it’s typically the fastest way to add an invoice to a project in Wrapbook. When you use the AP inbox, OCR technology will automatically extract the invoice data, saving time and reducing errors.
What is OCR technology?
Optical Character Recognition (OCR) is a feature that automatically extracts data from documents that are sent, forwarded, or uploaded to the system.
Wrapbook’s OCR for AP invoices is designed to streamline your workflow while maintaining your control over the invoice review process.
After the system automatically extracts data:
You have the option to review and update the data extracted
You’ll always have the final say on what gets processed in Wrapbook
Key Benefits
OCR for AP invoices is designed specifically for production accountants to:
Save time - Reduce invoice processing to a few minutes with automated data extraction
Reduce errors - Automated data capture minimizes manual entry errors and flags potential duplicates
Centralize data - All invoices are automatically stored, organized, and tracked in the platform
Using the project’s AP Inbox
Whenever possible, we recommend using the project’s AP Inbox, as it’s typically the fastest way to process AP invoices.
File requirements
Each project’s AP Inbox has a unique email address that can accept files meeting the following requirements:
The accepted file formats for uploading are PDF, PNG, JPG, JPEG
The file size limit per invoice is 30MB
The inbox cannot accept password-protected PDFs
Sharing the project’s AP invoice email address with your vendors
Each project has a dedicated AP invoice email address that you can copy and share with vendors.
To see the AP email address for a project:
In the left-side navigation, click the dropdown menu to select the project that you want to see the AP Inbox email for
In the left-side navigation, expand the ACCOUNTING menu, and then click Accounts payable
On the Accounts payable dashboard, click the + Create AP invoice button
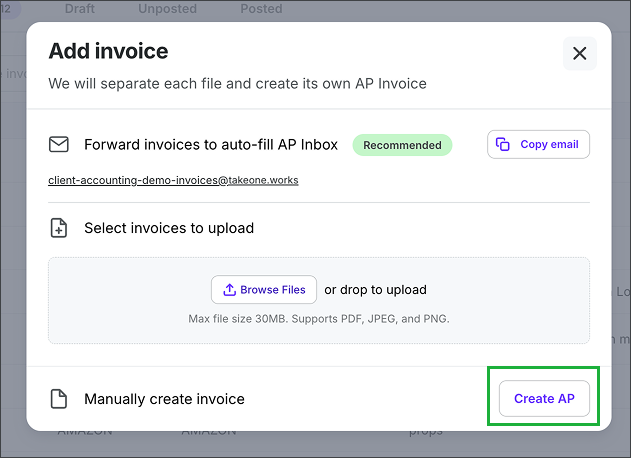
In the Add invoice popup, click the click the Copy email button to copy the email address for easy sharing with your project’s vendors
Click the X in the top-right corner of the popup to return to the project’s Accounts payable dashboard
You can share the email address that you just copied by pasting it into an email or text message sent to project vendors
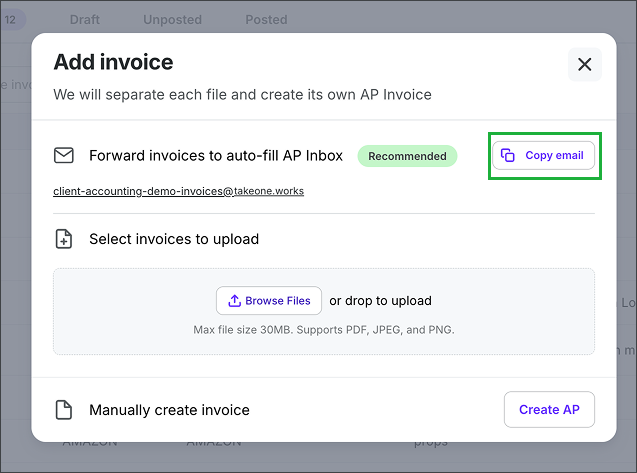
Click the Copy email button to copy the email address for the project’s AP invoice inbox. Click the X in the top-right corner of the popup to return to the project’s AP invoices dashboard.
Uploading invoices to the AP Inbox
Authorized company members can upload AP invoices that have been saved on their computer to the AP Inbox by doing the following:
In the left-side navigation, click the dropdown menu to select the project that you want to upload an AP invoice for
In the left-side navigation, expand the ACCOUNTING menu, and then click Accounts payable
On the Accounts payable dashboard, click the + Create AP invoice button
In the Add invoice popup, under Select invoices to upload, click the Browse files button to add an AP invoice that’s been saved to your computer. Alternatively, you can drag and drop the file directly into the popup.
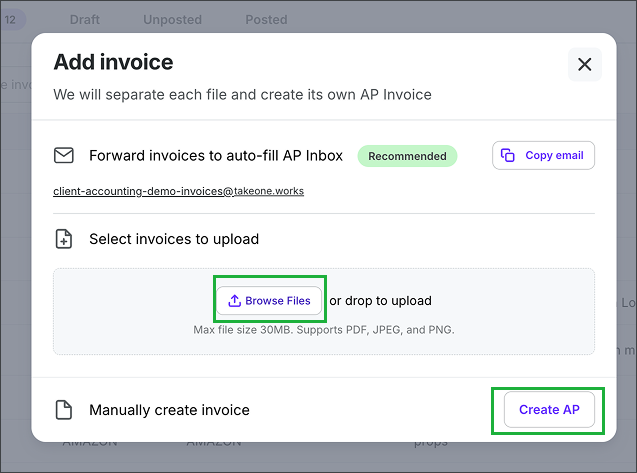
In the Add invoice popup under Select invoices to upload, you can drag and drop a file saved to your computer, or click the Browse Files button. Once you’ve selected the file and see it listed in the popup, you can click the Create AP button.
Reviewing invoices in the AP Inbox
When an invoice is sent to a project’s AP Inbox email address, it will appear in the project’s AP Inbox. Before you can process the invoice, you’ll need to:
Review the invoice and compare the details extracted by OCR to what appears in the documents
Update the invoice details if needed
Confirm the accounting bank account and payment method
Save the AP invoice
OCR status
When an invoice arrives in the AP Inbox, it enters the OCR scanning queue with a status of Processing until scanning completes successfully.
Once scanned, the invoice will show one of the following status:
Ready for review - Invoice has been scanned and has pre-filled all required fields for your review
Incomplete - Invoice has been scanned, but is still missing some required fields for you to verify and complete
Duplicate - Invoice has been scanned and potential duplicate information has been detected
Reviewing invoices and comparing the details
In order to save the invoice, you’ll need to review the details extracted from the OCR scan.
Here’s how:
On the project’s Accounts payable dashboard, click the AP Inbox tab
Click the Review button next to an invoice that you want to inspect
Review the invoice image displayed on the left side of the screen and confirm that all information has been accurately captured in the Invoice details section on the right side of the screen
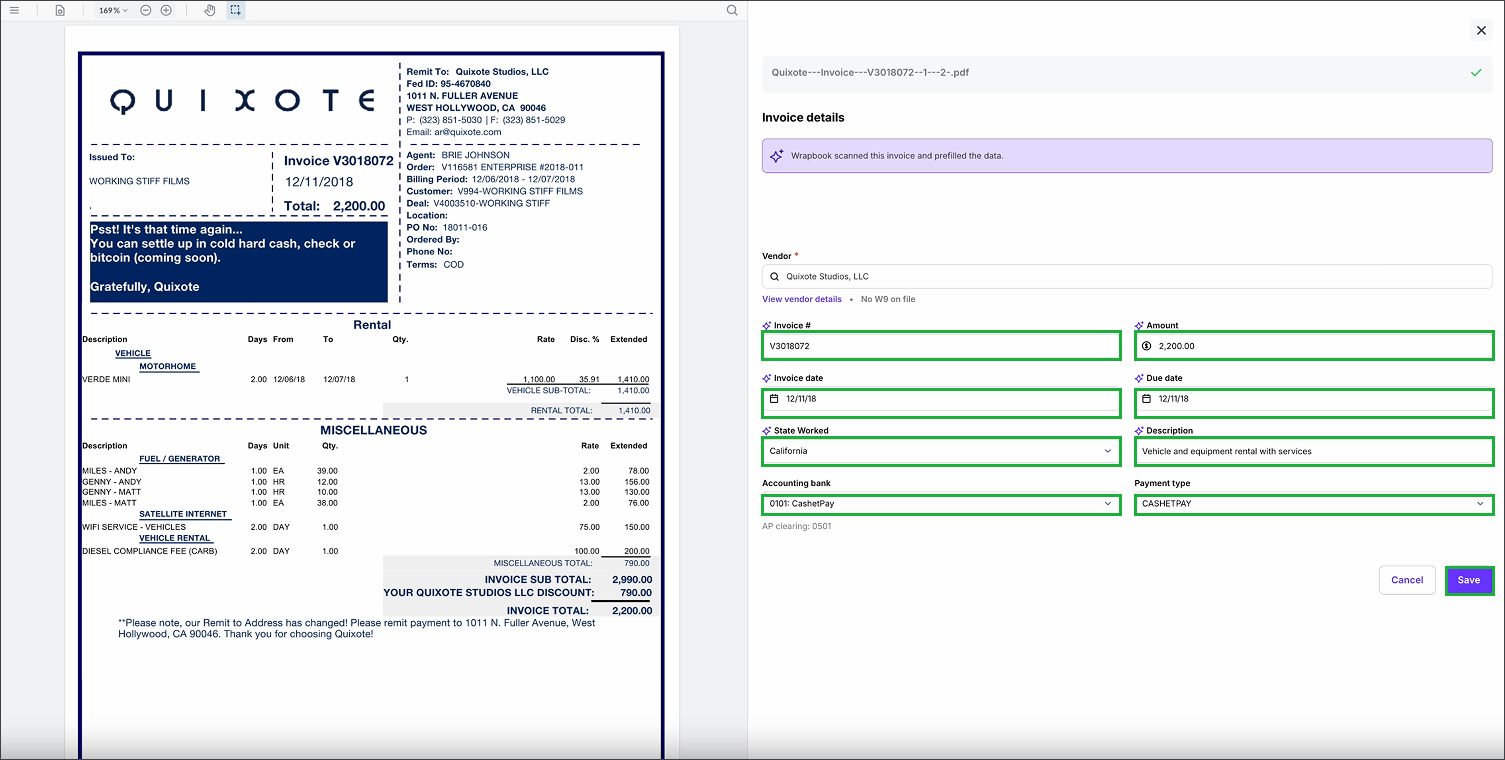
Compare the image of the AP invoice to what OCR has extracted and prefilled to the Invoice details on the right. You can click on any of the fields in Invoice details to update the information. When you’re finished, click the Save button.
Updating invoice details
Before processing vendor invoices sent to a project’s AP Inbox, you’ll always have the option to update any of the information listed under Invoice details
To update any of the information listed under Invoice details:
Click the field that you want to update
Enter the changes
If you update any of the Invoice details, the AP invoice will have the status: Unsaved changes. Once you’re finished updating the Invoice details, click the Save button. After you click Save, the invoice will be moved to Drafts.
Confirming the Vendor
Every AP invoice in Wrapbook needs to be connected to a vendor listed in your company’s Vendors database.
If the name of the Vendor on the AP invoice matches an existing vendor in your company’s database, they’ll be automatically connected and you can proceed to the next step [link]
If the Vendor name that’s extracted from the invoice doesn’t match an existing vendor record in your company’s database, you’ll be prompted to either create a new vendor or match the invoice with an official vendor in the system
To create a new vendor, click the button and then enter the vendor information. To learn more, see Add a vendor.
To match the invoice with an existing vendor in your company’s database, click the search icon and begin typing the name of the vendor. Click the name once it appears to connect it to the invoice.
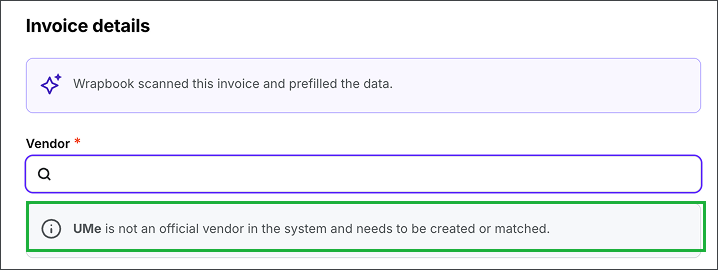
If the invoice cannot be matched with an existing vendor record, you’ll receive an alert
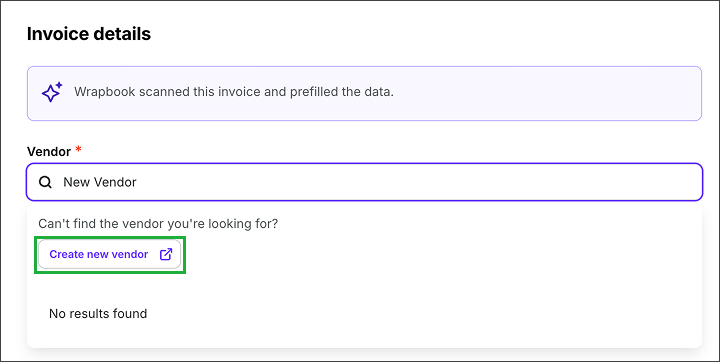
From here, you can click the search icon under Vendor to match the invoice with an existing vendor in your company’s database, or you can click the Create new vendor button to add a new vendor to the database
View and update vendor details
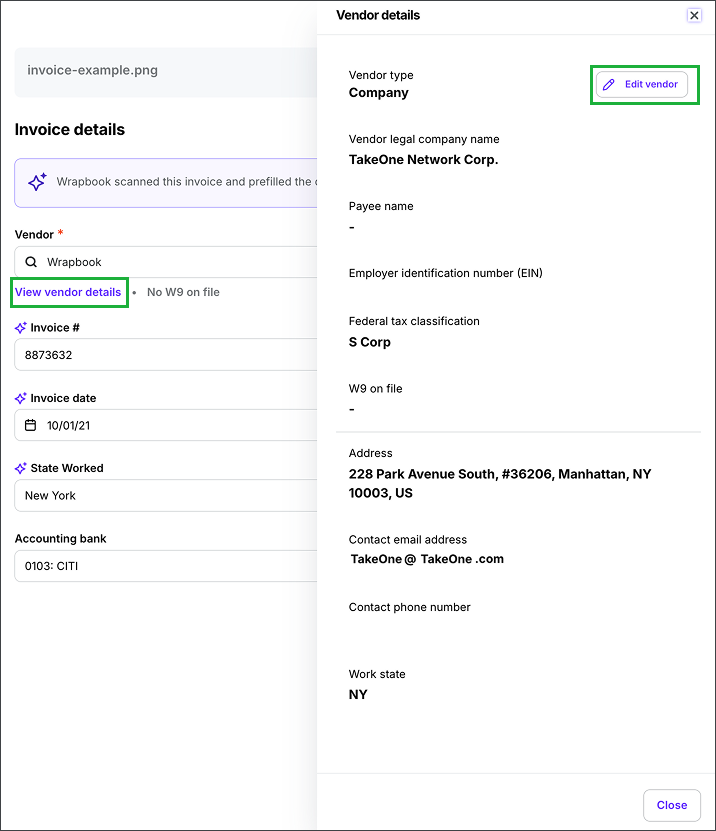
When processing AP invoices in the AP Inbox, you’ll also have the option to review and update the vendor’s details without leaving the page. If you make any changes to a vendor’s details, they’ll be applied to the vendor’s record in your company’s Vendors database.
You can access information on file for the vendor in the Invoice details, under Vendor
If your company has a copy of the vendor’s W9, it will be linked here. If the vendor doesn’t have a W9 on file, an alert will display saying: No W9 on file
You can click View vendor details to see the vendor record from your company’s Vendors database. To return to the Invoice details, click the Close button.
To update vendor details from an AP invoice:
Under Invoice details, click View vendor details
In the Vendor details panel, click the Edit vendor button
In the Edit Vendor popup, click on any of the fields to make changes
If you make any changes, click the Save Vendor button
Click View vendor details, then click the Edit vendor button

In the Edit Vendor popup, click on the fields to make your changes, and then click the Save Vendor button
Selecting the accounting bank account and payment method
If your company uses multiple bank accounts to pay vendors through Wrapbook, you can click the dropdown menu under Accounting bank to select the account that you’ll be using for the payment
If your company has set up multiple payment methods for vendor payments, click the dropdown menu under Payment type to select the method you’ll be using for the payment
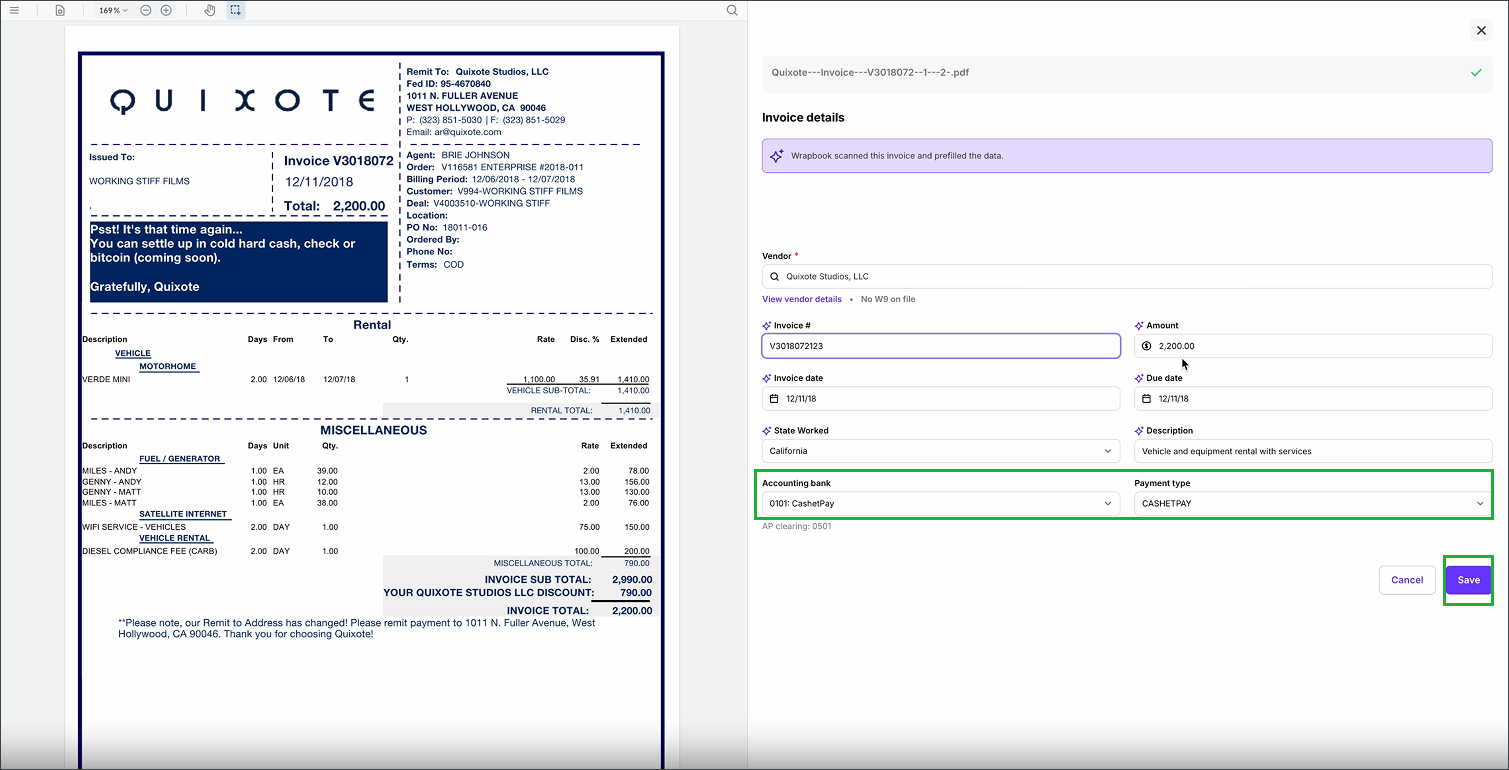
If multiple Accounting banks or Payment types are configured, you can change the selections by clicking the dropdown menus at the bottom of the Invoice details
Saving the invoice
After you’ve confirmed Invoice details are correct, click the Save button
Once the invoice is saved, the AP invoice will be in your Drafts tab on the Accounts payable dashboard
Relieving open POs & updating the Invoice summary
The Relieve open POs and Invoice summary sections are displayed when an AP invoice is in Draft or Unposted status.
You can use the Relieve open POs for this vendor section of the AP invoice to:
Associate existing POs with the AP invoice and and track fulfillment
To learn more, see How to relieve POs (PAS)
You can use the Invoice summary to:
View and track POs that are related to the AP invoice lines
See PO line item data including PO #, Description, Account, Open Amount, and Relieved Amount
Code the AP invoice POs
View PO#s and details associated with the invoice
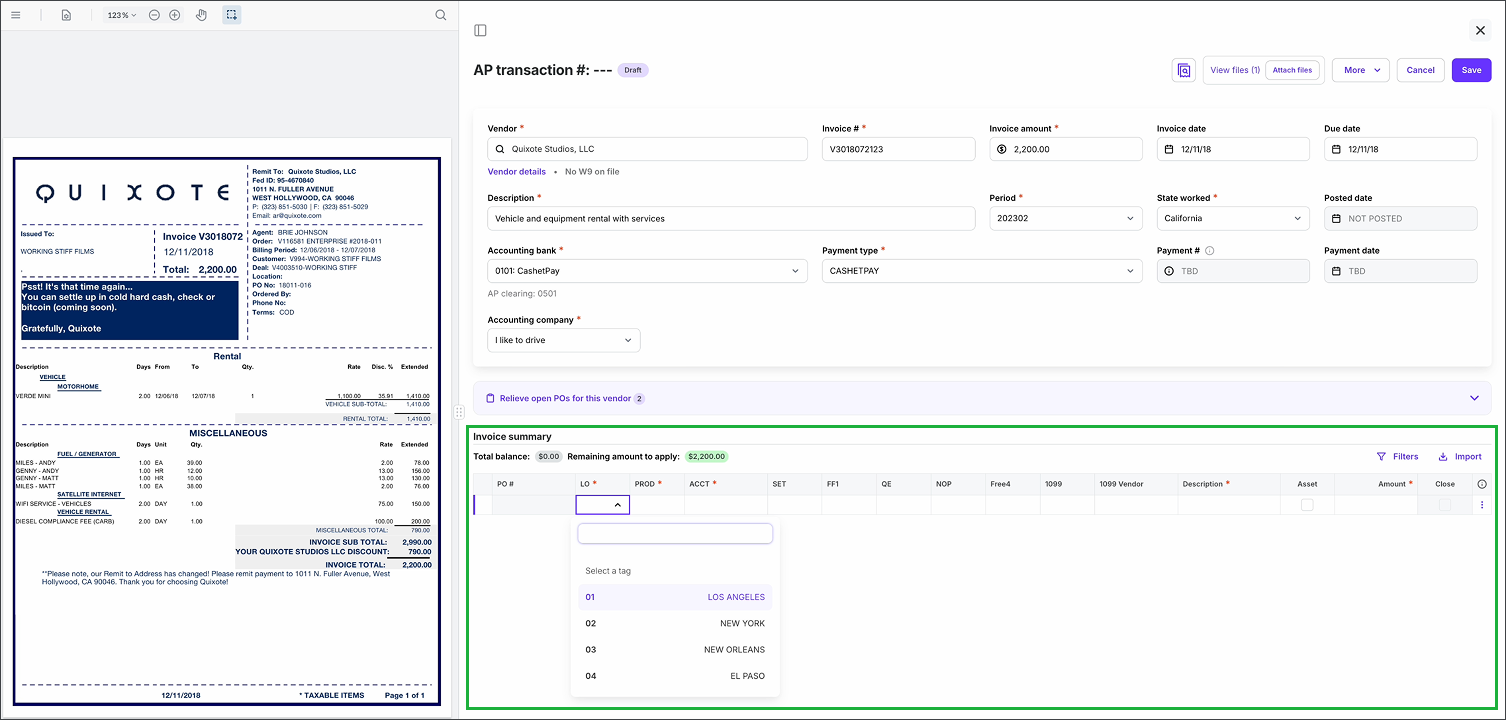
In the Invoice summary, you can code and update POs
Creating an AP invoice
If you prefer to manually enter the details for your AP invoices instead of using the AP Inbox:
In the left-side navigation, click the dropdown menu to select the project that you want to create an AP invoice for
In the left-side navigation, expand the ACCOUNTING menu, and then click Accounts payable
On the Accounts payable dashboard, click the + Create AP invoice button
In the Add invoice popup, click the Create AP button
On the AP transaction page, enter the required information
Invoice #
Invoice amount
Description
Period
State worked
Accounting bank
Payment type
You can use the Transaction Lookup drawer to cross check information from related records without leaving the page.
If you’re aging an AP invoice that will be paid by manual check or wire transfer, you can leave the Payment # and Payment date fields blank.
Click the Create AP button
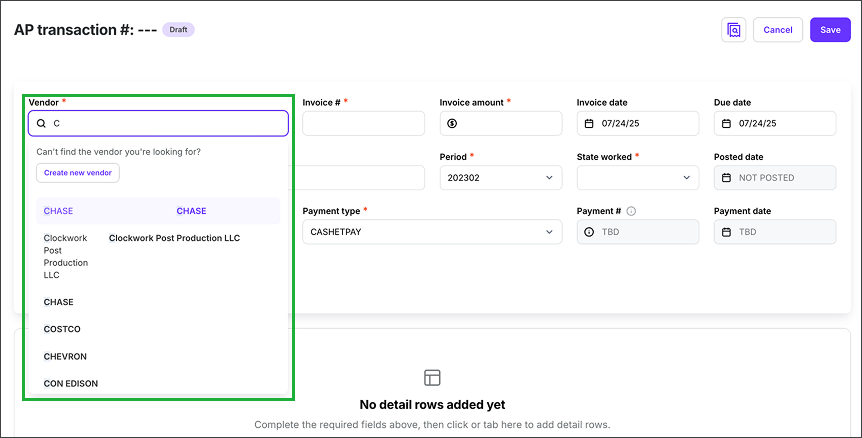
In the Vendor lookup field, begin typing the name of the vendor and then make your selection from the list, or click the Create new vendor button
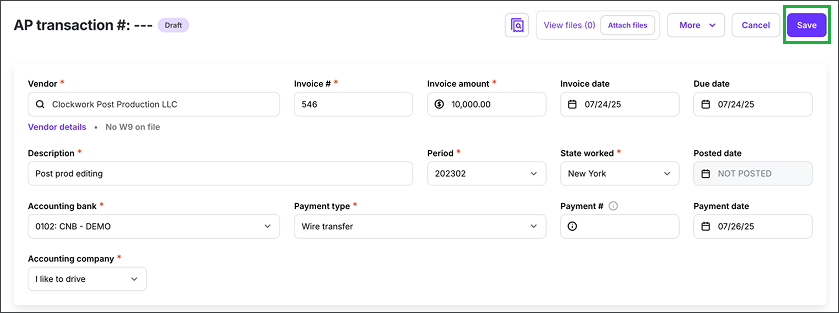
Enter the transaction details, then click the Save button
Relieving open POs & updating the Invoice summary
The Relieve open POs and Invoice summary sections are displayed once you click the Save button on the AP invoice.
You can use the Relieve open POs for this vendor section of the AP invoice to:
Associate existing PO lines with the AP invoice and and track fulfillment
POs that are already in the system that are related to AP lines will be pre-selected
When needed, you can create a new PO from the AP invoice
To learn more, see Relieve purchase orders (PAS)
You can use the Invoice summary to:
View and track POs that are related to the AP invoice lines
See PO line item data including PO #, Description, Account, Open Amount, and Relieved Amount
Code the AP invoice POs
View PO#s and details associated with the invoice
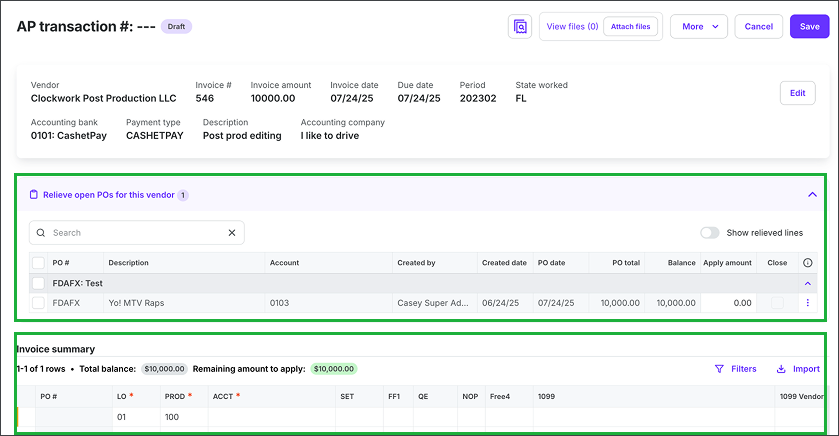
Use the Relieve open POs for this vendor, and Invoice summary sections to associate, track, and relieve POs for the AP invoice
Attaching files to an AP invoice in Wrapbook (PAS)
To add a digital copy of the invoice document to the AP invoice, click the Attach files button to upload documentation from your computer
When you’re finished, click the Save button
Saving the AP invoice
After you’ve entered information for a new AP invoice, click the Save button and select either:
Save as draft - saves the information that you’ve entered even if you haven’t entered all required information
Save as unposted - saves the information and assigns a transaction number to the AP invoice
Click here to learn how to post an AP transaction.
Once posted to the General Ledger (GL), the AP invoice will be added to the Vendor payments dashboard, under Unpaid invoices