Adding an allowance to a project worker's timecard is permission based.
To add an allowance to a project worker's timecard, your account must have one of the following roles enabled:
Role: Company Admin, Company Manager, or assigned Project Coordinator
Custom role with: Projects, People & Approvals/Project management - Full access, or Manage; Payroll & Financials/Allowances - Full access, or Create and manage
Overview
In the New Timecards Experience, authorized production administrators can add allowances directly from a project's Timecards dashboard. Allowances cover additional compensation items such as per diem, mileage, kit fees (also called kit rentals or box rentals), and more. Once added, allowance amounts are reflected in the worker's timecard totals.
How to add an allowance
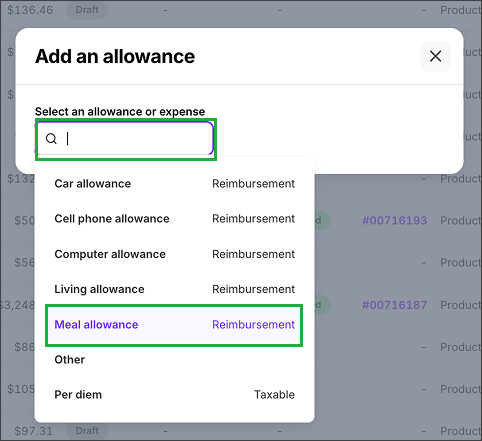
At the top of the project's Timecards dashboard, click the + Add allowance button
In the Add an allowance popup, click the search bar and then click to select the allowance type that you want to add
Note that there are now two options for per diem: Per diem Non-Taxable appears at the top of the list, and Per diem Taxable appears at the bottom of the list
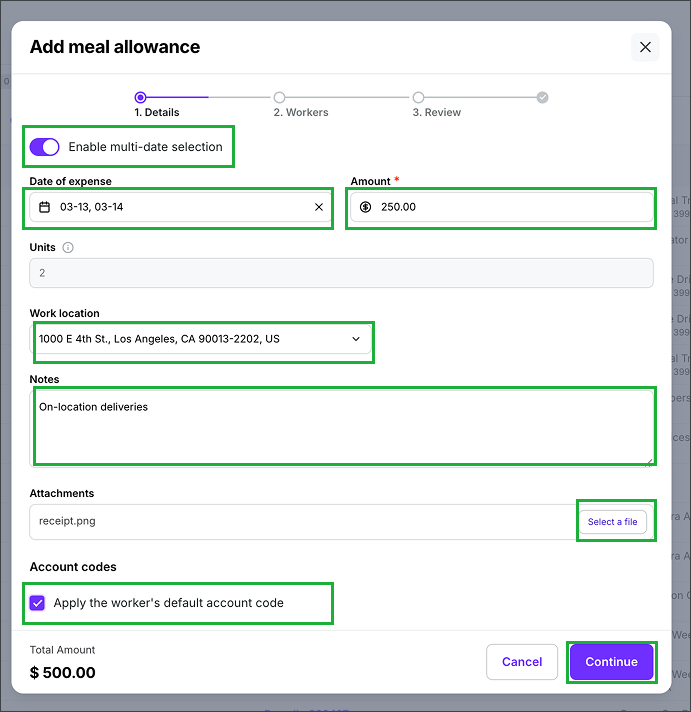
Under Details:
To add the allowance to more than one day, click the toggle next to Enable multi-date selection
Enter the required and optional information. The details that you're prompted to add depends on the type of allowance selected. Details that are required are marked with an asterisk (*).
When entering the allowance details, you'll have the option to add:
Work location
Notes
Attachments - Click the Select a file button to add a file that's saved to your computer
Account codes
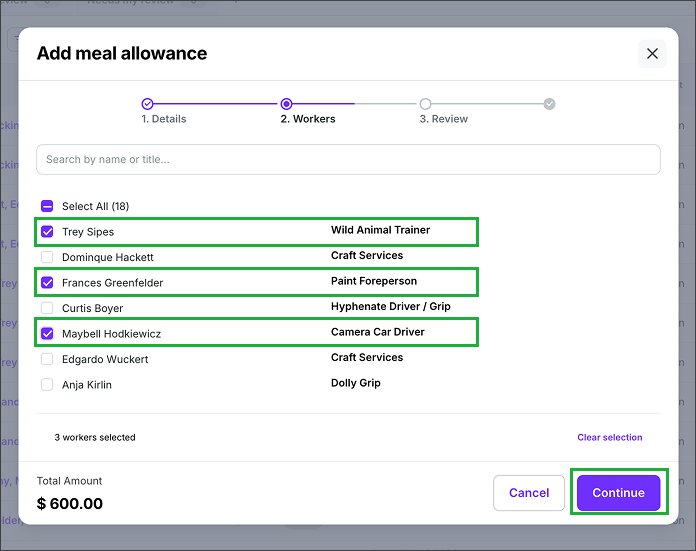
For Workers, click to select the workers that get the allowance, and then click the Continue button
You can enter names and titles into the search bar to find specific workers
If you don't see the worker listed, make sure that they have been invited to the project first.
For Review, verify that the details added are correct. When you're ready, click the Continue button and the allowance will be added.

To add an allowance, you can click the + Add allowance button directly on the project's Timecards dashboard
In the Add an allowance popup, click the search bar and then select the allowance type
In the popup, enter the required and optional details. To add the allowance to more than one day, click the Enable multi-date selection toggle. To apply worker default account codes, click the checkbox at the bottom of the popup. When you're ready, click the Continue button.
Enter a name or title into the search bar and/or click to choose the project workers that received the allowance, then click the Continue button.

Review the details and then click the Submit button
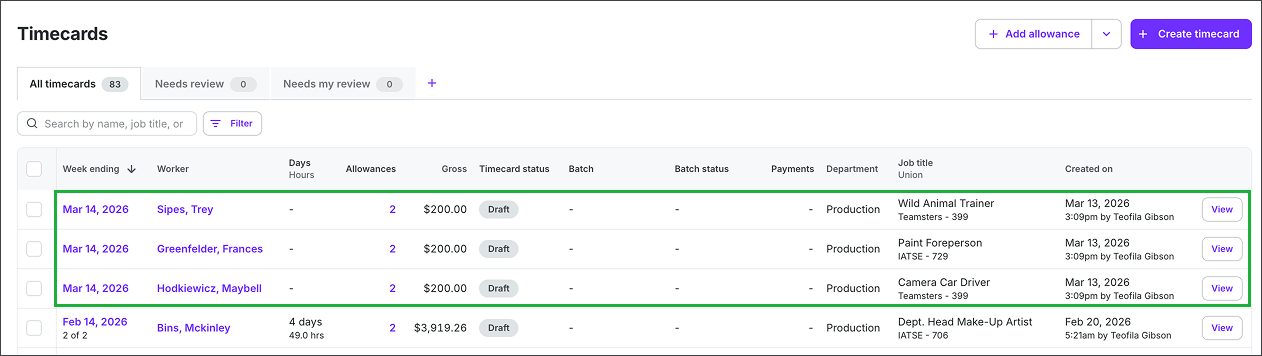
The allowances will be listed on the Timecards dashboard
Allowance types
Click the arrow to see the types of allowances that can be added
Allowance type
Classification
Details needed
Per diem
Non-Taxable
Per diem type
Date of expense
Daily amount *
Units *
Kit/box fee
Also called: kit rental, box rental, equipment rental fee
Taxable
Date of expense
Daily amount *
Units *
You'll be able to download Wrapbook's inventory template or upload your own inventory file.
Mileage
Non-Taxable
Number of miles *
Standard mileage rate - will be automatically calculated
Date of expense
Total amount *
You'll be able to download Wrapbook's mileage template or upload your own mileage file
Wardrobe allowance
Taxable
Date of expense
Amount *
Units *
Wardrobe cleaning
Reimbursement
Date of expense
Amount *
Units *
Buyout - Other
Taxable
Date of expense
Amount *
Units *
Buyout residuals
Pensionable`
Date of expense
Amount *
Units *
Other wages
Taxable
Date of expense
Work location
Worker(s)
Rate(s)
Advance
Taxable
Hours worked *
Date of expense
Net amount *
Units *
Car allowance
Reimbursement
Date of expense
Amount *
Units *
Cell phone allowance
Reimbursement
Date of expense
Amount *
Units *
Computer allowance
Reimbursement
Date of expense
Amount *
Units *
Living allowance
Reimbursement
Date of expense
Amount *
Units *
Meal allowance
Reimbursement
Date of expense
Amount *
Units *
Other
Select type of expense:
Reimbursement (non taxable)Invoice
Per diem
Taxable
Date of expense
Amount *
Units *
Using a separate timecard for allowances only
By default, a project worker's allowances and wages appear together on a single timecard in the New Timecards Experience. If your company prefers to keep wages and allowances separate, you can create a dedicated timecard for a worker that contains only their allowances.
To do this:
Create a second timecard for the worker for the same workweek (in addition to their wages timecard)
In the second timecard, leave the wages grid blank, and add all of the worker's allowances to that timecard. To learn how to create an additional timecard, see Create a timecard for a project worker.
Notes:
Only authorized company team members can create multiple timecards for a worker in the same workweek. Project workers cannot create more than one timecard per workweek.
Both timecards will appear on the project's Timecards dashboard and will need to be submitted and approved separately
If you delete an allowance submission, it will