Overview
The Wrapbook app allows workers to manage their projects, submit timecards, and track payments on the go. The app is currently available for iOS devices only. While the app isn’t available for Android devices, you can access your Wrapbook account on the go from any mobile device (including devices that use Android) by going to https://app.wrapbook.com/login .
App features
With the iOS Wrapbook app you can:
Complete onboarding tasks
Track your payments
Submit your timecards
Submit your expenses and invoices
Manage your PCard spending
View your project dashboard
View project details and production contact email
Access your payment information
Manage your account settings
How to get the Wrapbook app
For iPhone users:
Open the Apple App Store on your iPhone
Search for “Wrapbook”
Download and install the application
Login with your Wrapbook credentials
Note: The Wrapbook app is currently only available in the United States App Store. If you're located in another country and need to install the app, please contact the Support team.
.png)
Screenshot of Wrapbook iOS app Login
How to use the Wrapbook app
Once you login to the Wrapbook app, you’ll see your app home screen. From here, you can access the following:
Projects
The Wrapbook app lets you quickly see your projects and project details while on the go.
At the top of your home screen you can quickly scroll through your projects
Tap on a project to see its details
Your Projects dashboard
At the bottom of your home screen, you can tap the Projects icon to go to your Projects dashboard
Tap View Project to see its details
.png)
Scroll through your projects at the top of the home screen, or click the Projects icon at the bottom of your home screen to go to Your Projects dashboard
(1).png)
On Your Projects dashboard you can scroll through your projects. Click the View Project button to see its details.
Project details
When you tap on a project in the Wrapbook app, you’ll be able to see the following project details at the top of the page:
Project name
Production company
Beneath the production company’s name, you can tap Email project contact to send a message to your production’s administrators.
Your job title
Your work start and end dates
Total issued gross pay for the year- This is the total dollar amount of money that you’ve been paid through Wrapbook for the project
Total issued net pay for the year - This is the the total dollar amount of your paychecks, less taxes and other types of withholdings that you’ve been paid through Wrapbook for the project
Total pending gross pay - This is the total dollar amount of money that is pending payment
Previous payments
To learn more, see About payments.
Complete your onboarding
You can use the Wrapbook iOS app to complete project onboarding and fill out your startwork.
To get started, you can do either of the following:
At the top of the home screen, swipe through your projects until you see the project name, and then tap Complete startwork
At the bottom of the home screen, tap the Projects icon to go to Your Projects dashboard. On the dashboard, tap Complete Onboarding beneath the name of the project.
Note that these options will only display if you haven’t completed your startwork for a project.
To learn more, see About onboarding.
Access completed startwork
If you want to access startwork forms that you’ve already filled out:
Tap View Project to go to its project details
Scroll to the bottom of the screen, and then tap Documents
Under Documents, you can scroll down the screen to access forms that you’ve completed
Timecards
In Wrapbook, your timecards are organized by project. From the app, you can create a new timecard or update an existing timecard.
To create a new timecard in the Wrapbook app
Click the + icon at the bottom of the homescreen
To access an existing timecard in the Wrapbook app
Tap on a project
Then tap Edit timecard
To fill out your timecard in the Wrapbook app
Tap the workweek from the drop down menu
Tap the workday
Enter the required information
Repeat for each day worked
Tap Save and Review
Tap Submit
In the timecard you can also do the following:
Copy your start and end times for one day to another day in the same workweek by clicking the copy icon
Clear out all details that you’ve entered for a day by clicking Clear
Delete a meal by clicking click the trash icon
To learn more about how timecards work in Wrapbook, see How to fill out your timecard.
.png)
Tap the + icon to create a new timecard
.png)
Tap the dropdown to select the workweek
.png)
Tap on each day worked and enter the required information. The information you’re required to enter may vary based on the project. Once your finished, tap the Save and Review, then tap Submit.
Add an expense in the app
You can begin creating an expense in the Wrapbook app by either:
Using the Expense icon at the top of the homescreen
Using the + icon at the bottom of the homescreen
Next:
Tap the Expense icon
Under Add expense /allowance, scroll through the available options, tapping on the one that best describes the expense that you’re submitting
Under Work Location tap the lookup icon to select the place the expense is related to
Under Date of Expense, tap the calendar icon to select the date(s) the expense took place
Under Amount, tap the field to enter the dollar amount of the expense
Enter additional information as required. This information you’re prompted to enter depends of the type of expense you’ve selected.
Tap Select a file to add an image of a receipt, invoice, or other proof of expense that’s saved to your device
Tap Submit
To learn more, see How to add allowances and expenses.
Requests
To review timecard, expenses, and invoices that you’ve submitted, click Requests at the bottom of the screen.
To learn more, see How to track allowance and expense submissions.
.png)
At the bottom of the screen, tap Requests to see your timecard and expense submissions. On the Requests screen, you can tap to toggle between your submissions and your payments.
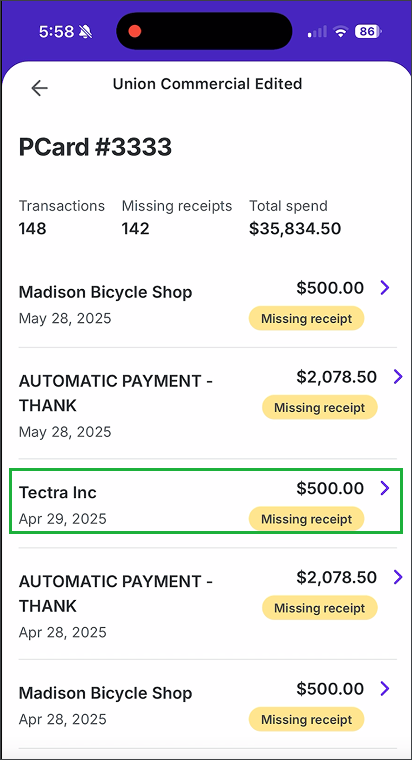
PCards
If you’ve been issued a PCard, you can track your spending and add receipts to document production-related purchases.
To see your PCard transactions:
At the bottom of the home screen, tap the Projects icon to go to Your Projects dashboard
Tap on the name of the project that you want to see your PCard transactions for
On the project dashboard, scroll down until you see the PCard # and tap View details
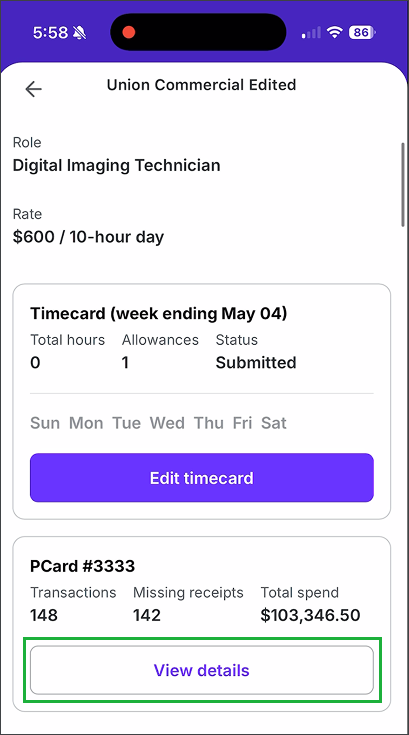
Tap View details
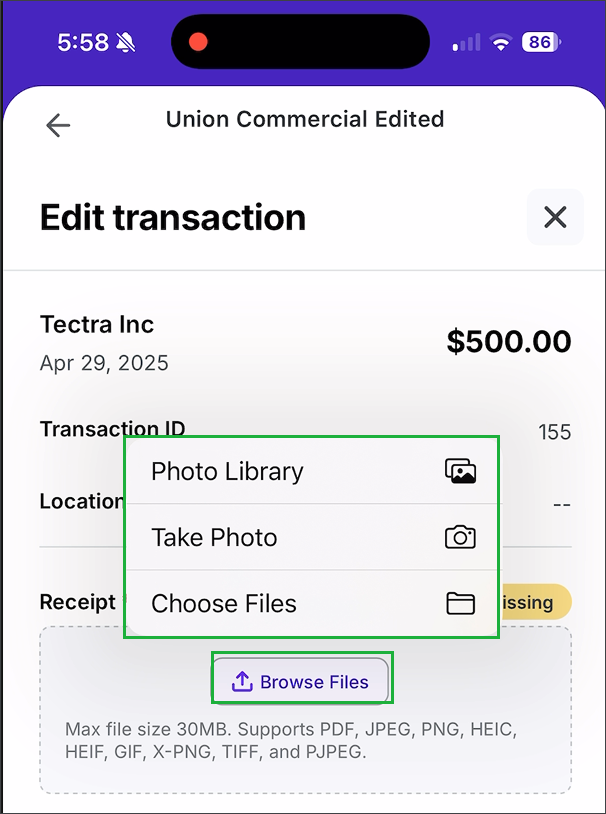
To add a receipt to a PCard transaction:
On the PCard dashboard, find the transaction in the list and tap on it to open the record
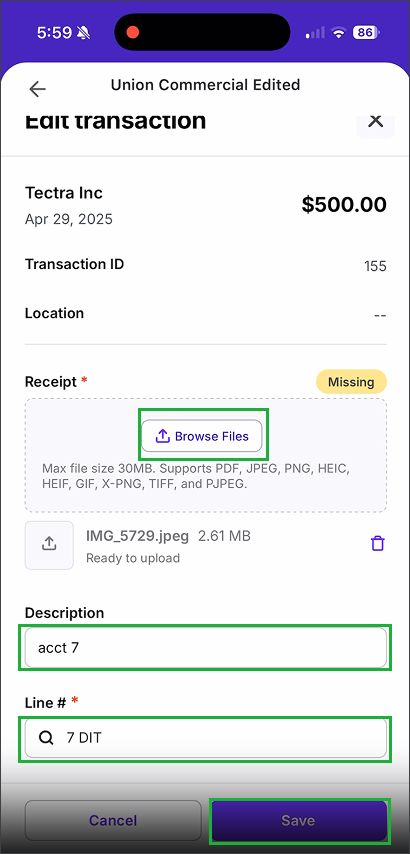
On the Edit transaction screen, tap the Browse files button and then tap to either upload a photo from your iphone library, take a photo, or upload a file documenting the purchase that’s saved to your device
Tap the Description field to add notes for the purchase
Tap to complete any required fields, then tap the Save button
Once the receipt is successfully added to the PCard transaction record, you’ll see a confirmation alert, and the transaction will be moved to the bottom of your PCard transactions list
Tap the transaction
Tap Browse Files and then make your selection
Once a files is added, it will display beneath the Browser Files button. Tap to add an optional Description, and then tap Save.
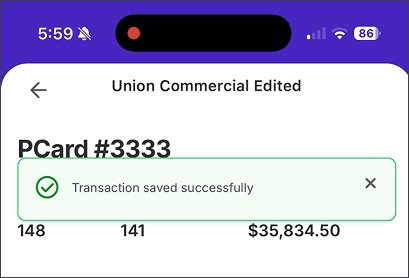
An alert will confirm that the transaction saved successfully
Settings
You can access your Wrapbook account settings through the iOS app by tapping Settings at the bottom of the screen.
On your Settings screen, you can access the following:
Account Details - Name, contact, emails, and social links
Payment Method - Digital or mailed check
Loan Out Company (if you’re classified as a loan-out worker)
Multi-factor authentication and email notification settings
Personal Tax Information - Legal name, address, etc.
Tax Withholding - Filing status, allowances, adjustments, etc
Tax Documents - W-9, W-4, etc.
Scroll further down to access:
Demographic Survey - if you’ve added this information
Paid Sick Leave - Track & submit your Paid Sick Time benefit
Terms of Service
Contact support
Sign out
To learn more, see Account details.
.png)
At the bottom of the screen, tap Settings to see your Account Details, Payment Method, and Tax settings
How to get help using the Wrapbook app
If you experience any problems with the Wrapbook app:
First, ensure your app is updated to the latest version in the App Store
Try logging out and logging back in to refresh your session
If issues persist, contact the Wrapbook Support team by clicking the help icon within the app. When reporting an issue, please include:
Your device model
iOS version
App version number
Description of the problem
Screenshots of the issue (if possible)