This help article is related to the Production Accounting Suite
In Wrapbook, production accountants and administrators can manage budgets using either the Production Accounting Suite or Cost tracking. To understand the differences, click here.
The Production Accounting Suite (PAS) is permission based
To access PAS features in Wrapbook, your account must have one of the following roles enabled:
Role: Company Admin, Accountant
Custom role with: Accounting & Cost Tracking settings enabled
Overview
In Wrapbook, Production Accounting settings are configured at both the company and project level.
Company accounting settings
In the company-level Accounting settings, you can access the following:
To learn how to manage these settings, see Company settings / Accounting settings.
Project accounting settings
When PAS is enabled, you’ll be able to access project-level Accounting settings for the following:
In addition, you can manage the project’s Chart of Accounts (COA) which is required in order to use accounting features in Wrapbook.
COA options include:
Access project-level accounting settings
At the top of the left-side navigation, click the dropdown menu
Select All projects
In the left-side navigation, click Company settings, and then scroll down until you see Accounting settings
Select the project, click Project settings, then click Accounting
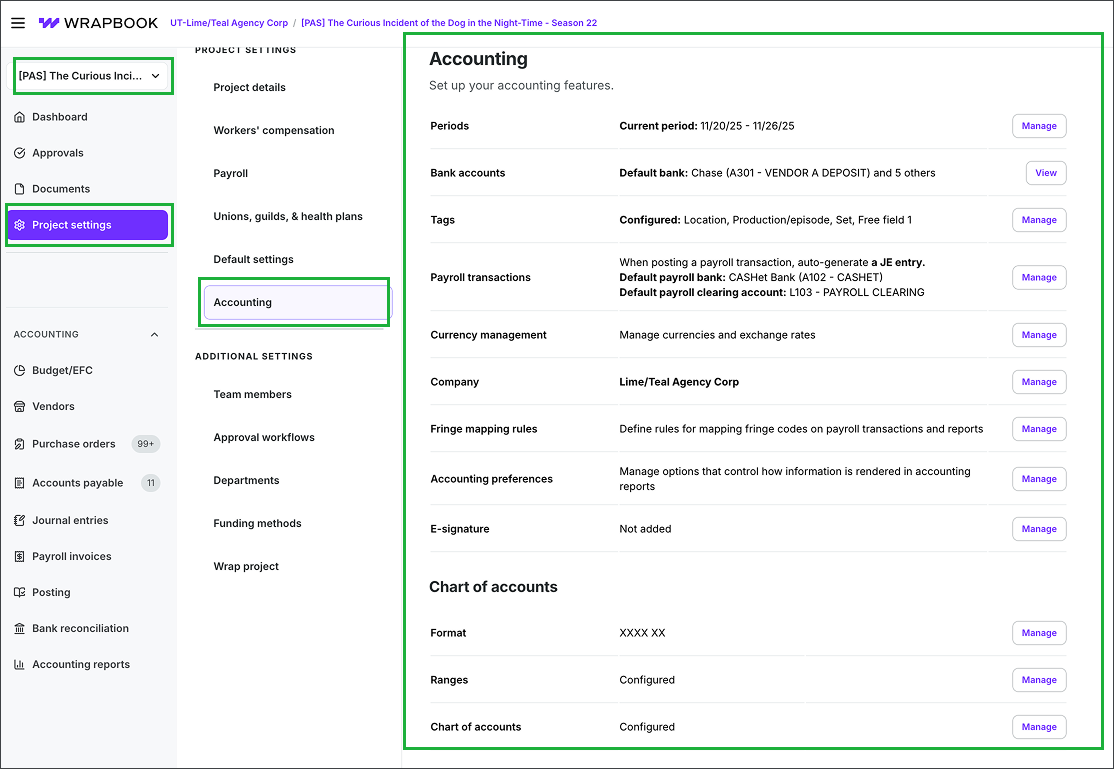
Accounting settings options
On the Accounting settings page, you can click the Manage or View button to update the following:
Periods
Defines how accounting periods are tracked
You can choose between period numbers or effective dates
This setting cannot be changed after saving
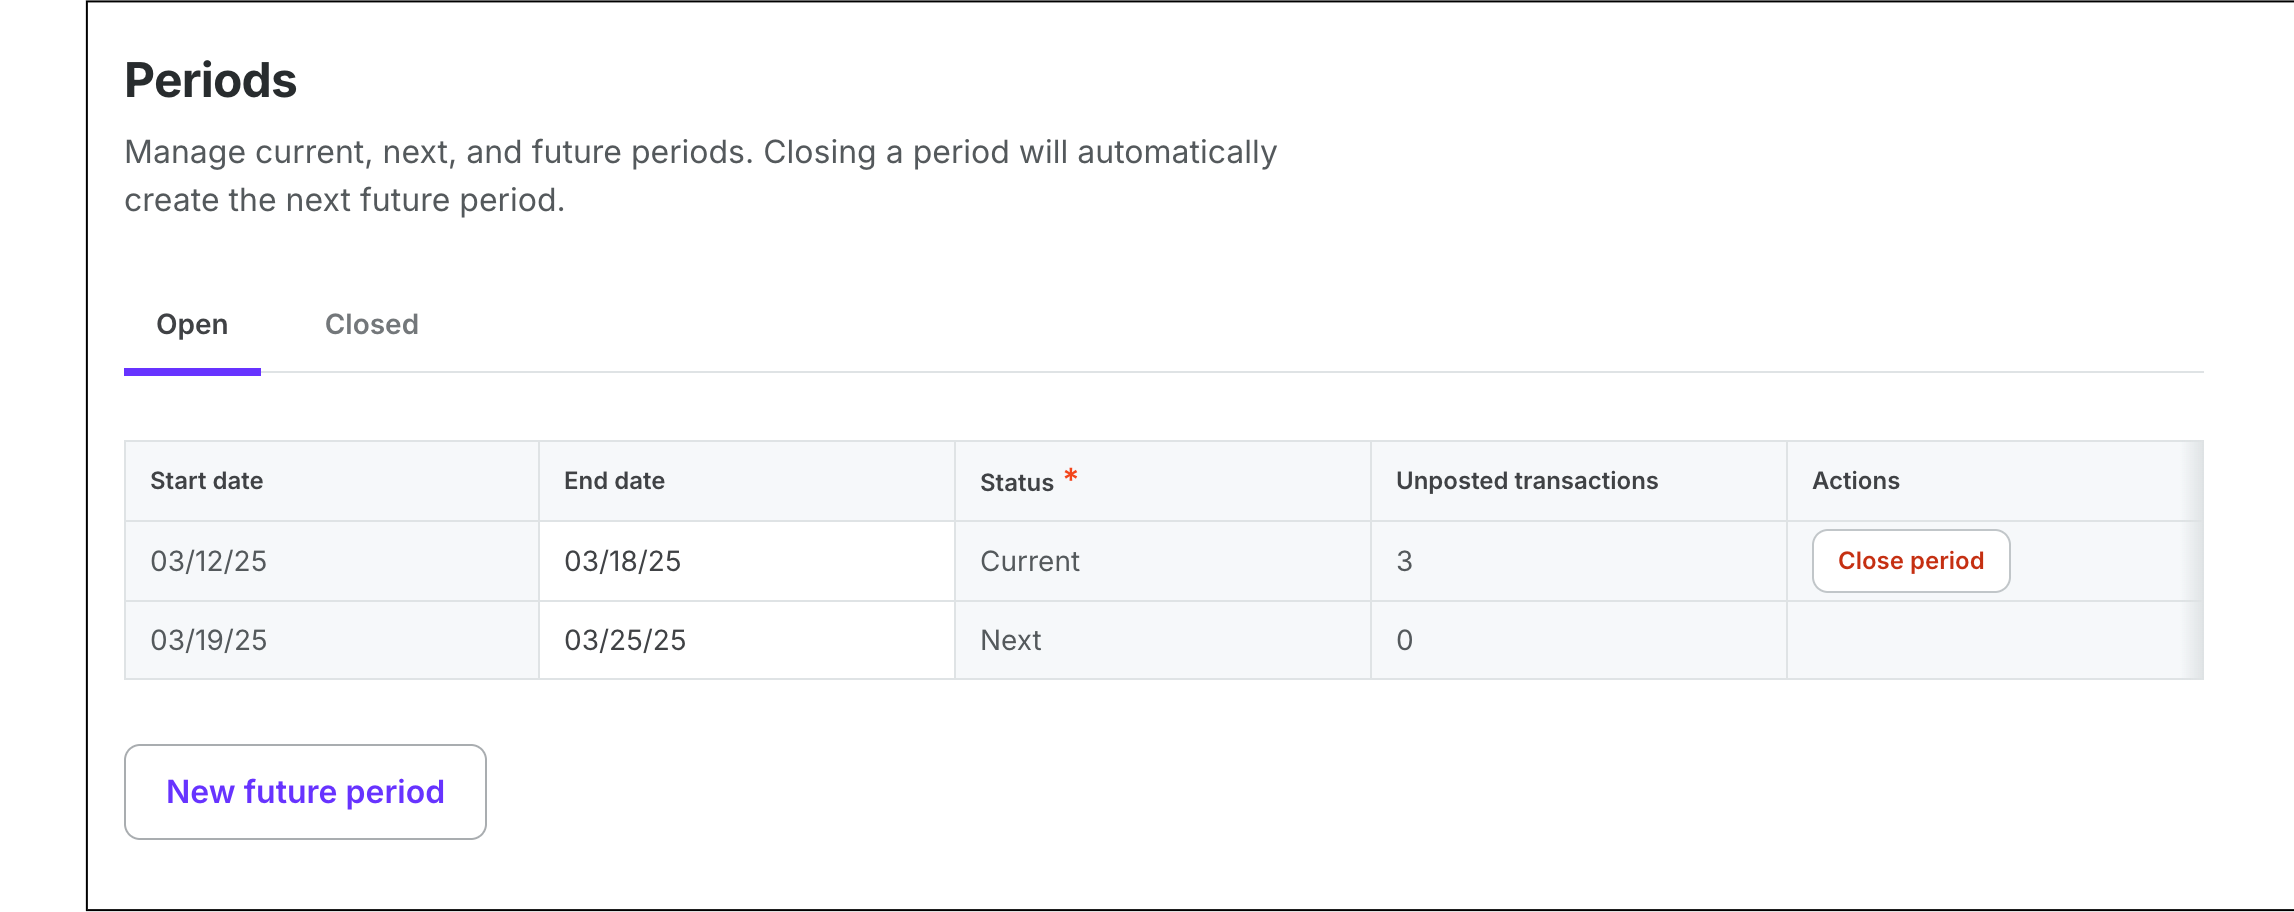
Example of the Periods page in Project settings/Accounting
Bank accounts
Setup of bank accounts including CASHétPay integration (if using) and clearing accounts
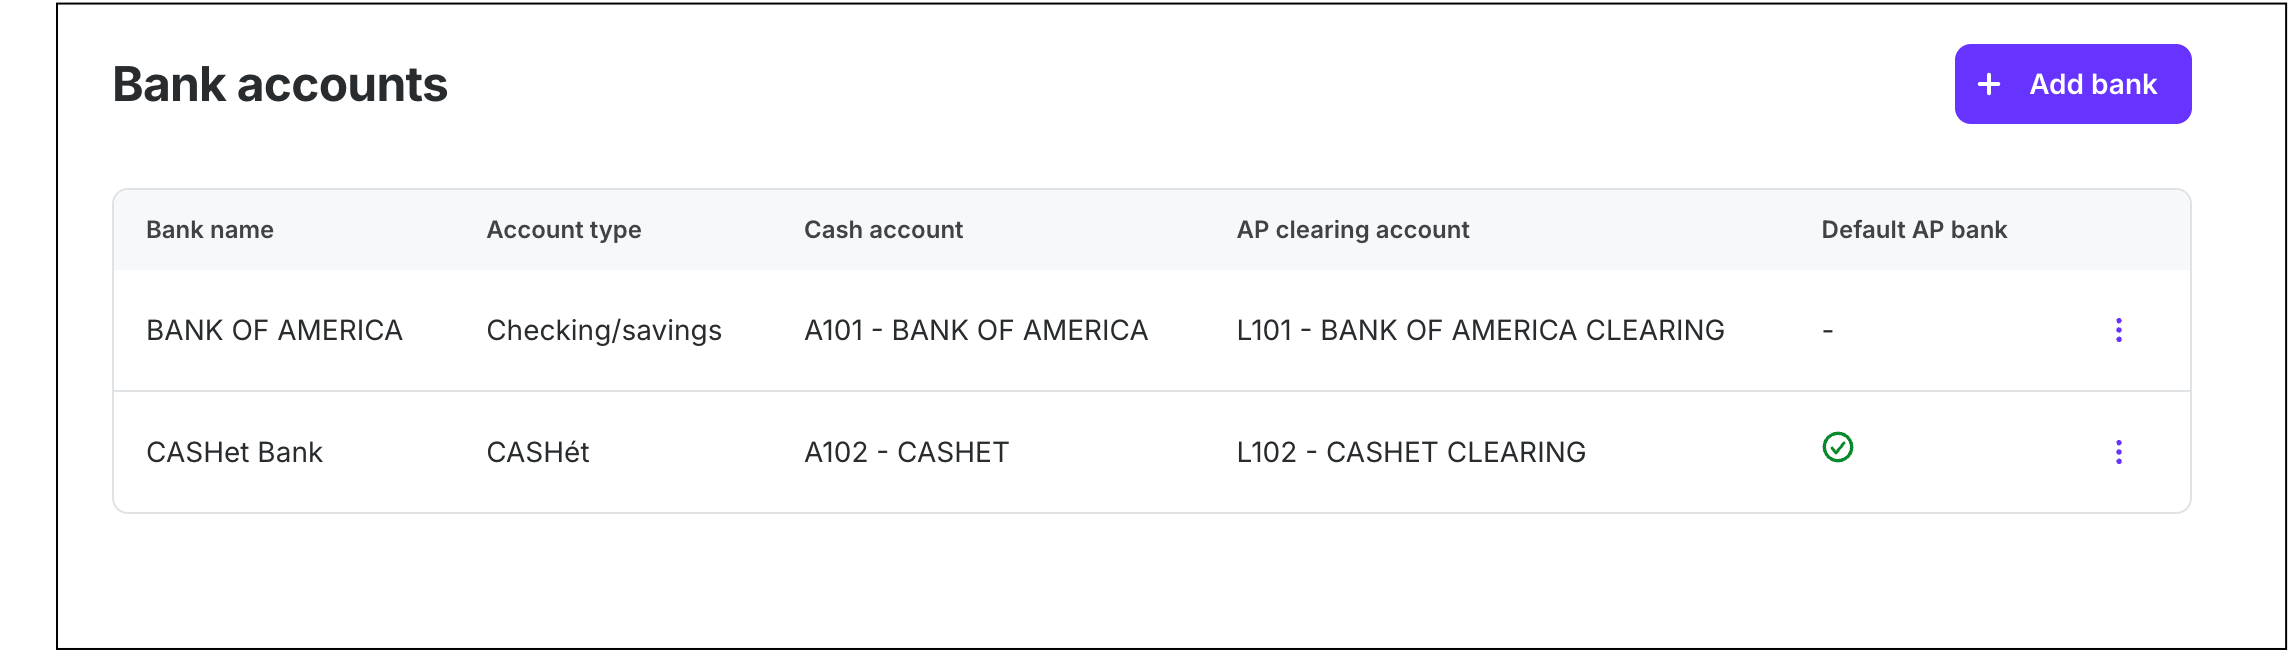
Example of the Bank accounts page in Project settings/Accounting
Tags
Tags are used to categorize and track transactions throughout a project. Each tag includes a code, description, and other relevant details that need to be saved after setup. In the Accounting settings, there are pre-defined tag types. You can update a tag’s definition, by clicking the Manage tags link.
Each Tag type has options for:
Tag type - One of the predefined Tag types listed below
Code length - Automatically populates based on the number of characters in the tag
Label - This the tag that will be used
# of active tags - Automatically populates based on the number of times the tag is currently being used
Actions - click the Manage tags link next to a tag type to update it’s definition and settings. On a Manage tags page, you can click the fields to make changes, or click the three dots in a row to deactivate or delete it. If you make changes to a Manage tags page, be sure to click the Save all button.
The pre-defined Tag types available are:
Location - Identifies where filming is conducted or where expenses occur
Prod/Epi Used to identify specific episodes or production segments
Set - Tracks set-related costs, including construction and furnishings
Free Fields Can be used to track custom items like production incentives, reshoots, or insurance claims
1099 - Identifies payments to vendors that qualify as reportable income to the IRS
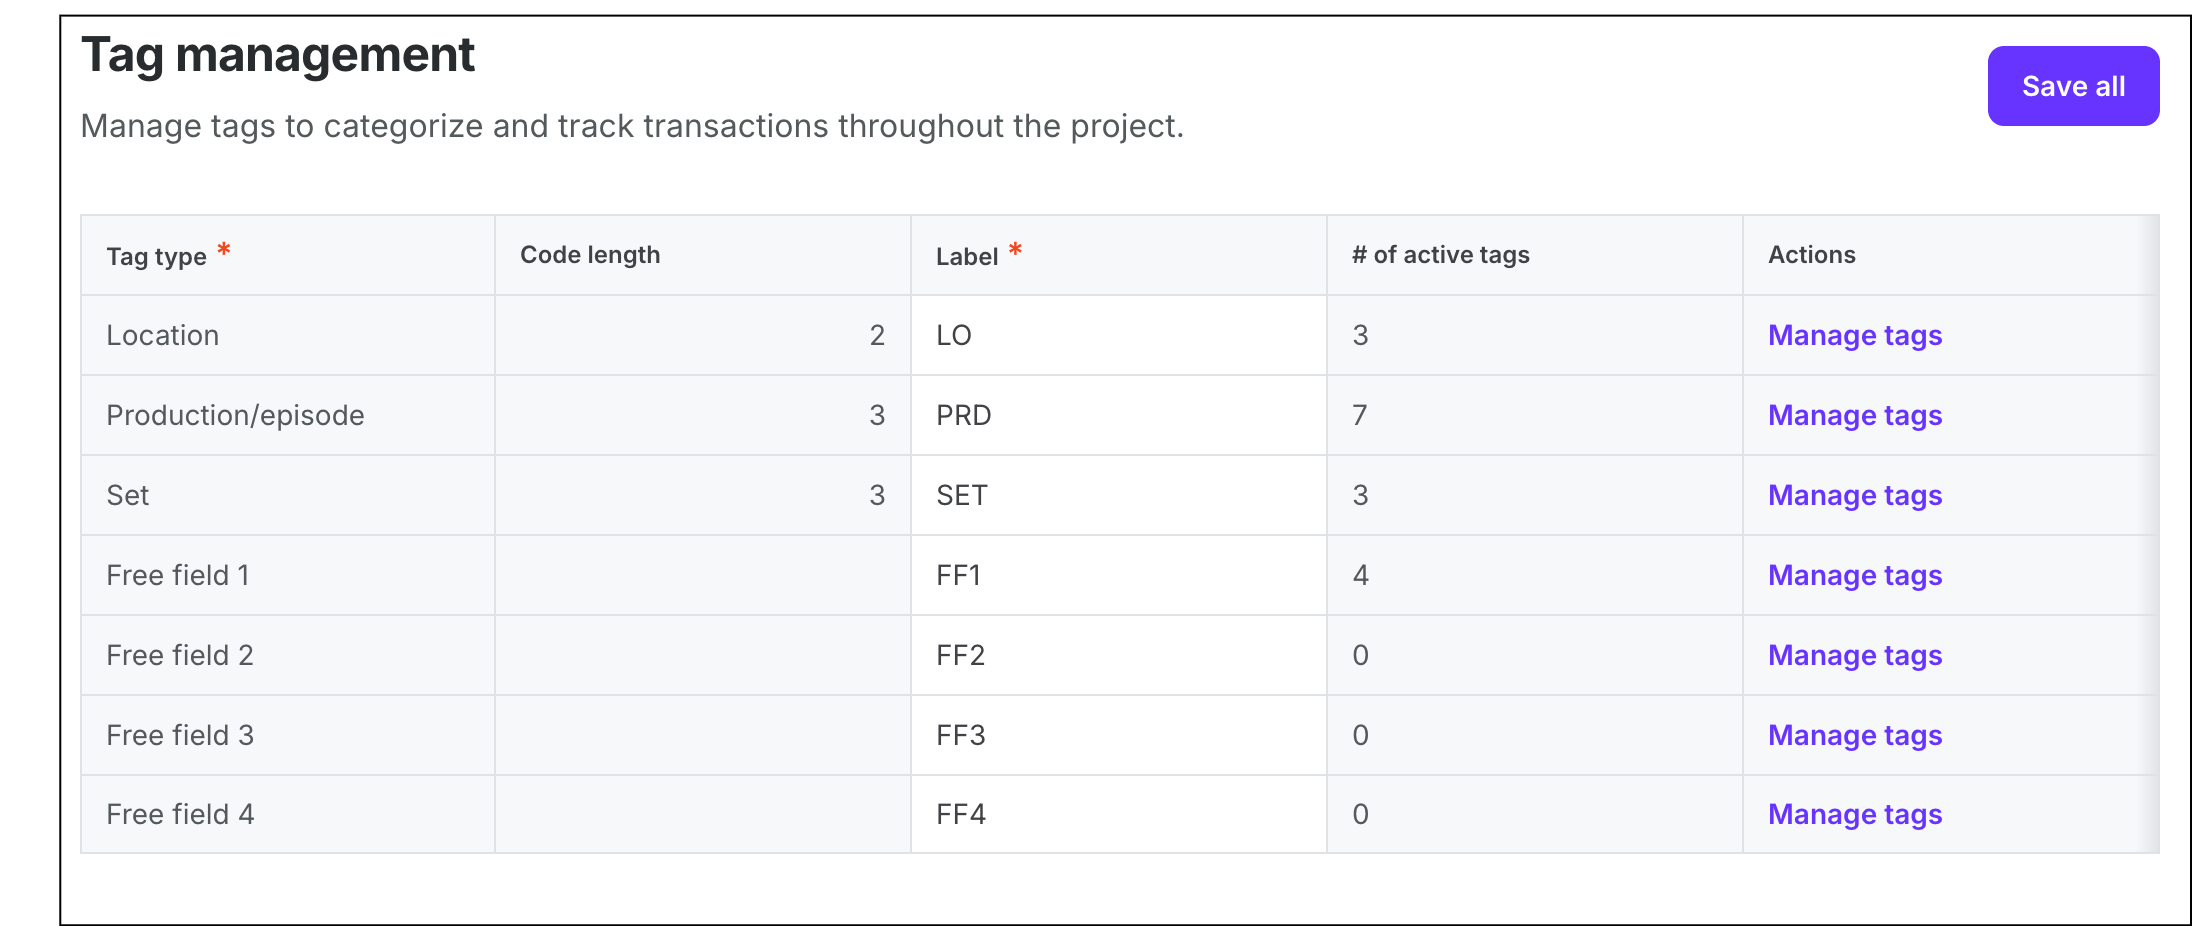
Example of the Tag management page in Project settings/Accounting. Under Actions, you can click Manage tags to review or update each Tag type.
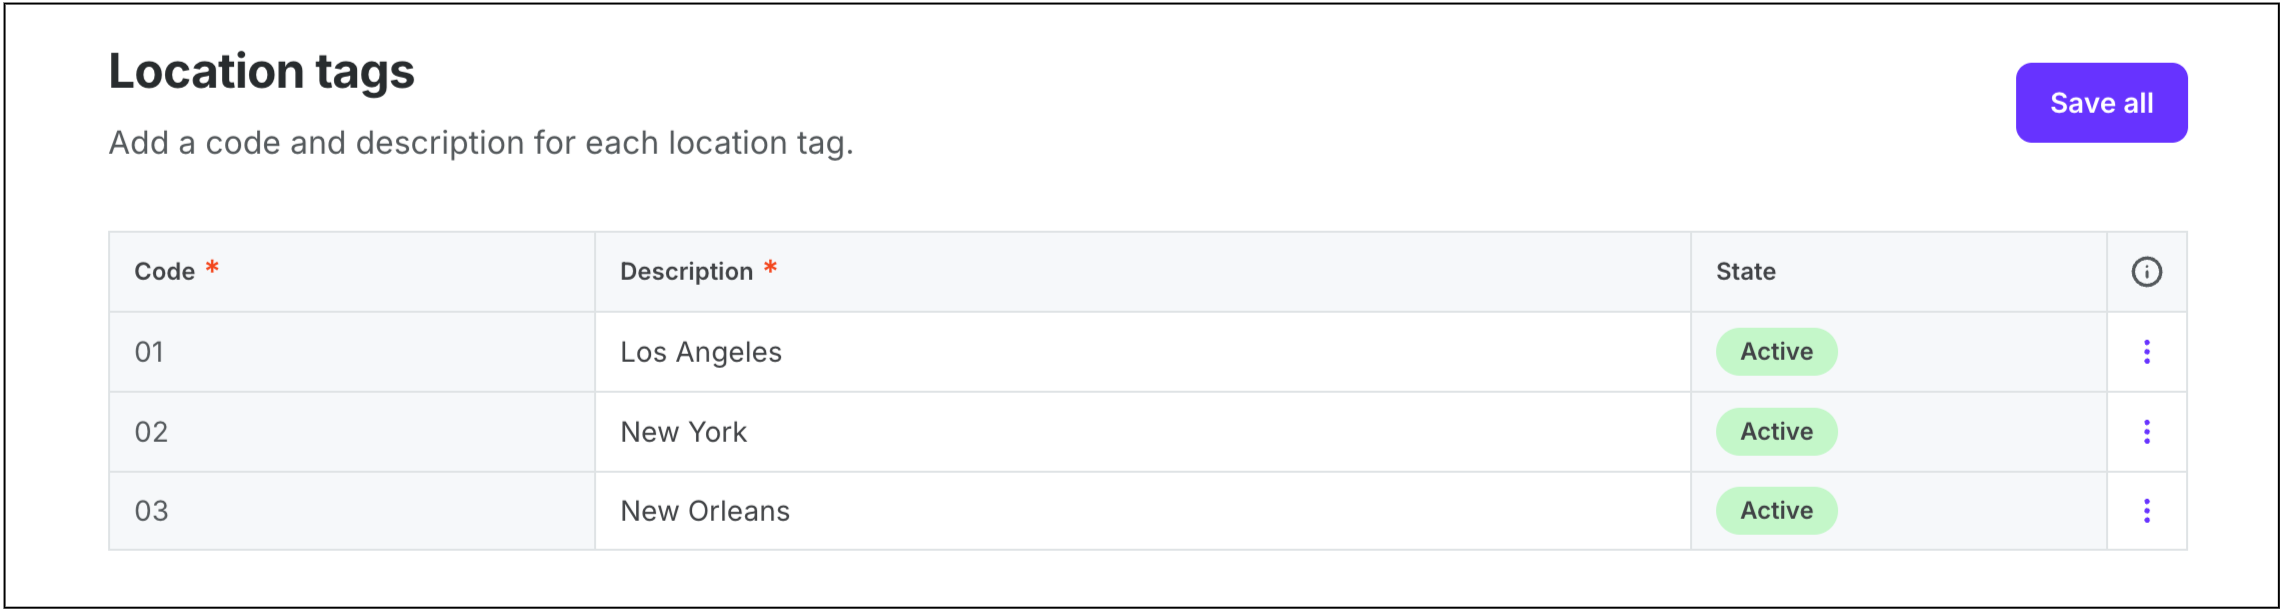
Example of Location tags settings
Payroll transactions
Identifies the default bank and clearing account for payroll transactions, with options to automatically create accounts payable (AP) invoices or journal entries (JEs) for each payroll transaction
You can click on the fields to make updates. The options available are based on your Company settings and other Project settings
You can click the three dots to Copy to all
If you make changes, be sure to click the Save button
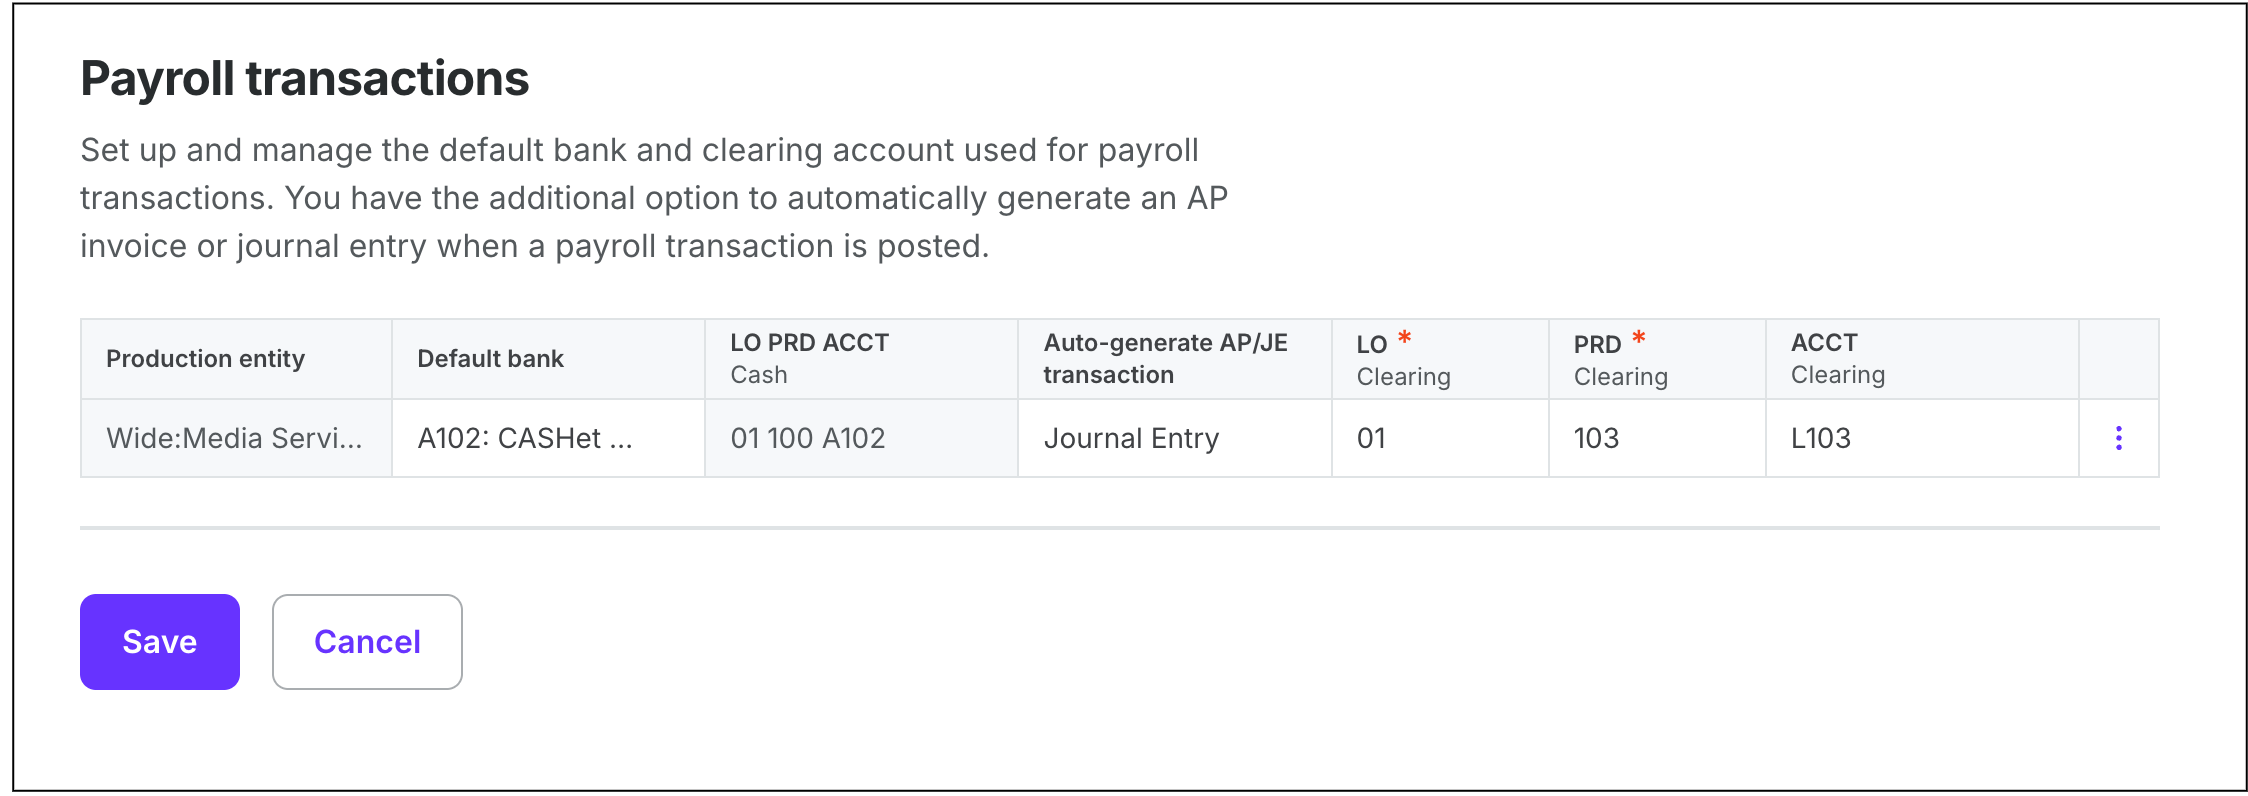
Example of the Payroll transactions page in Project settings/Accounting
Using multiple payroll clearing accounts
Wrapbook supports multiple payroll clearing accounts per production entity (PE). This lets you track labor and fringe costs for a project separately and manage unique offset accounts across multiple PEs.
When you setup multiple payroll clearing accounts in Wrapbook you can:
Track labor and fringe costs separately
Handle PEs with distinct offset accounts
View employee-level accruals — including sick, vacation, and holiday benefits — in both the Trial Balance and General Ledger (GL)
To configure multiple payroll clearing accounts for a project:
On the Payroll transactions page, find the row for the Production entity (PE) that you want to update
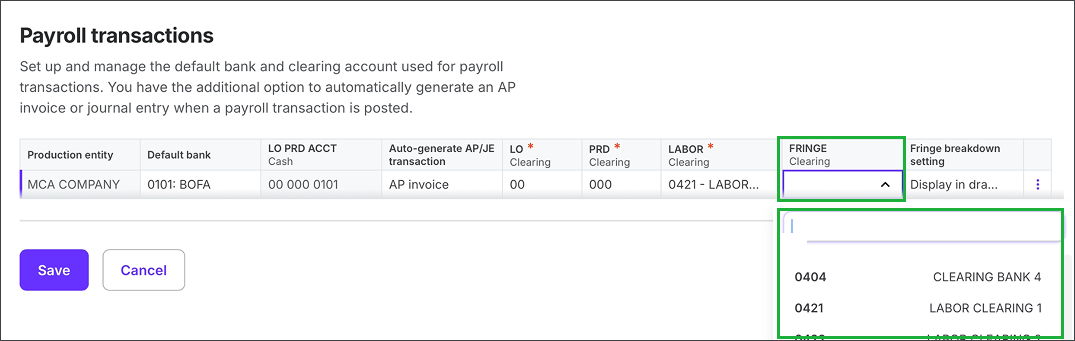
Click the cell under FRINGE, to select the payroll clearing account to be used. Your list of options is based on the payroll clearing accounts that are in the project’s Chart of Accounts (COA).
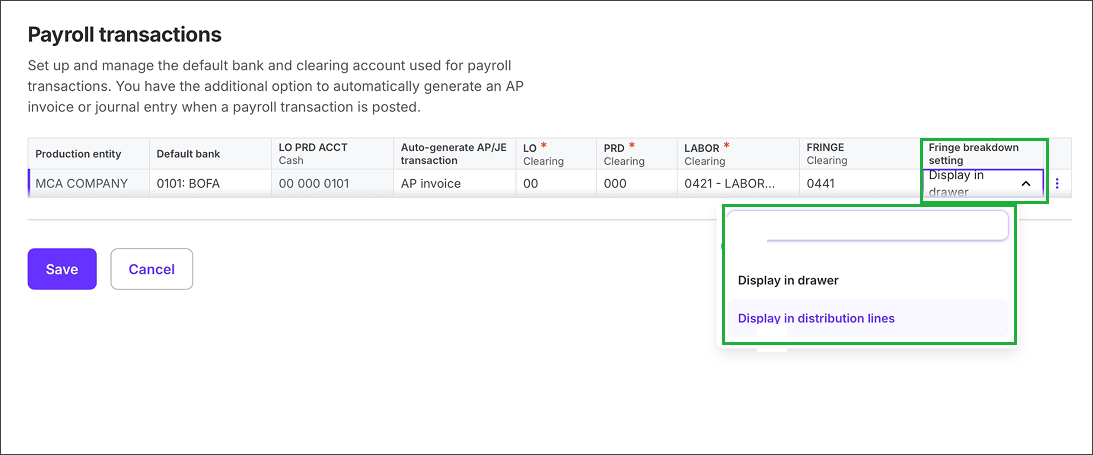
Click the cell under Fringe breakdown setting to select either: Display in drawer or Display in distributions lines
Display in drawer - When you hover your cursor over a Fringes link in an Invoice summary, a drawer will open showing the full, per‑employee fringe breakdown
Display in distribution lines - When you view an Invoice summary, each fringe type is shown inline as a separate line item directly in the distribution grid without opening a drawer. This is useful when you need to code fringes differently for incentives or audit in-line.
Click the cell under FRINGE to select the clearing account to be used
Click the cell under Fringe breakdown setting to select either: Display in drawer, or Display in distributions lines
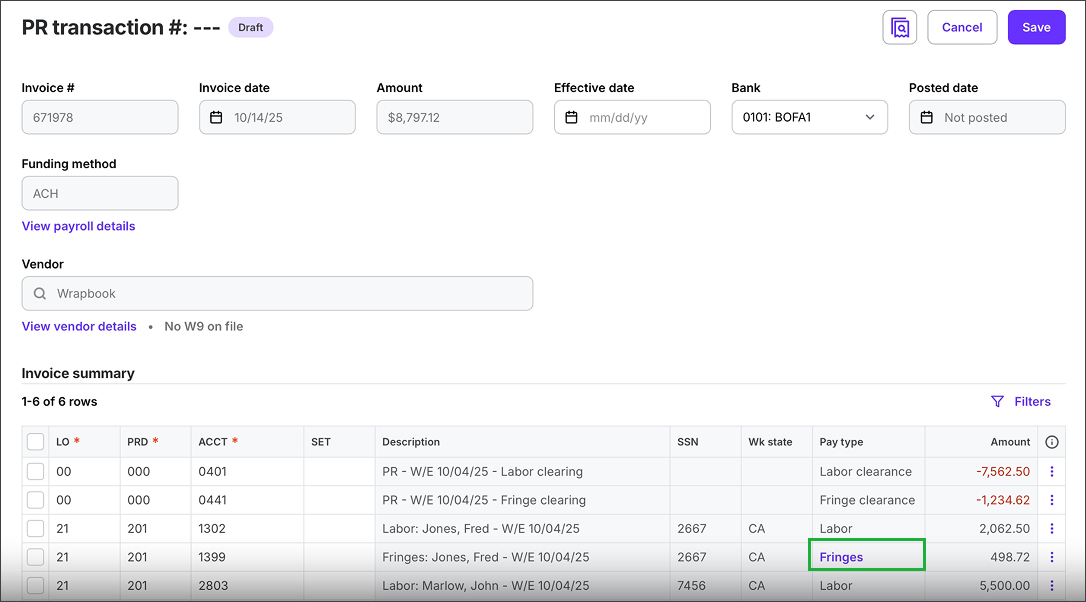
Display in drawer option: Step 1 - Hover over the highlighted Fringes link to open the drawer
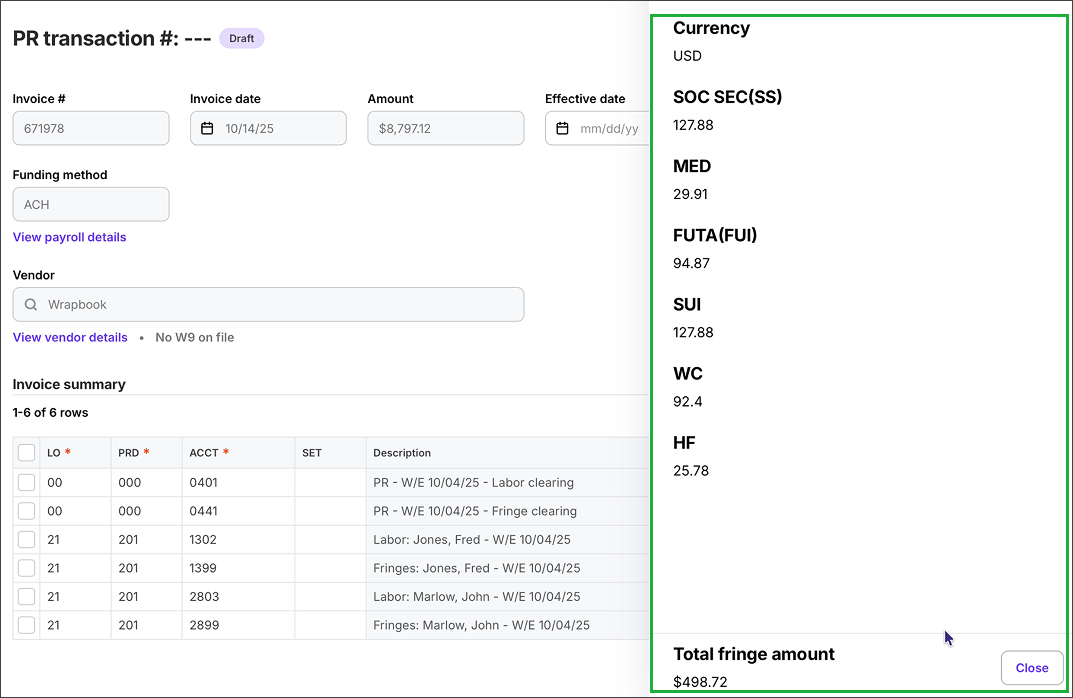
Display in drawer option: Step 2 - In the drawer, you can see the fringe breakdown
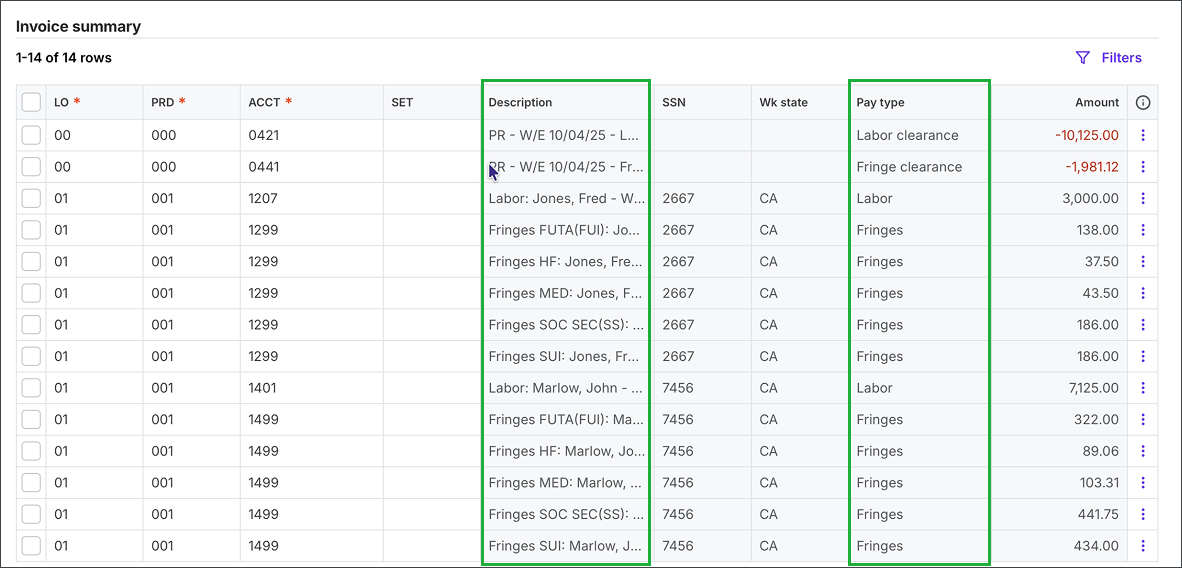
Display in distribution lines option: In the Invoice summary, you can see the breakdown in the Descriptions and Pay type columns
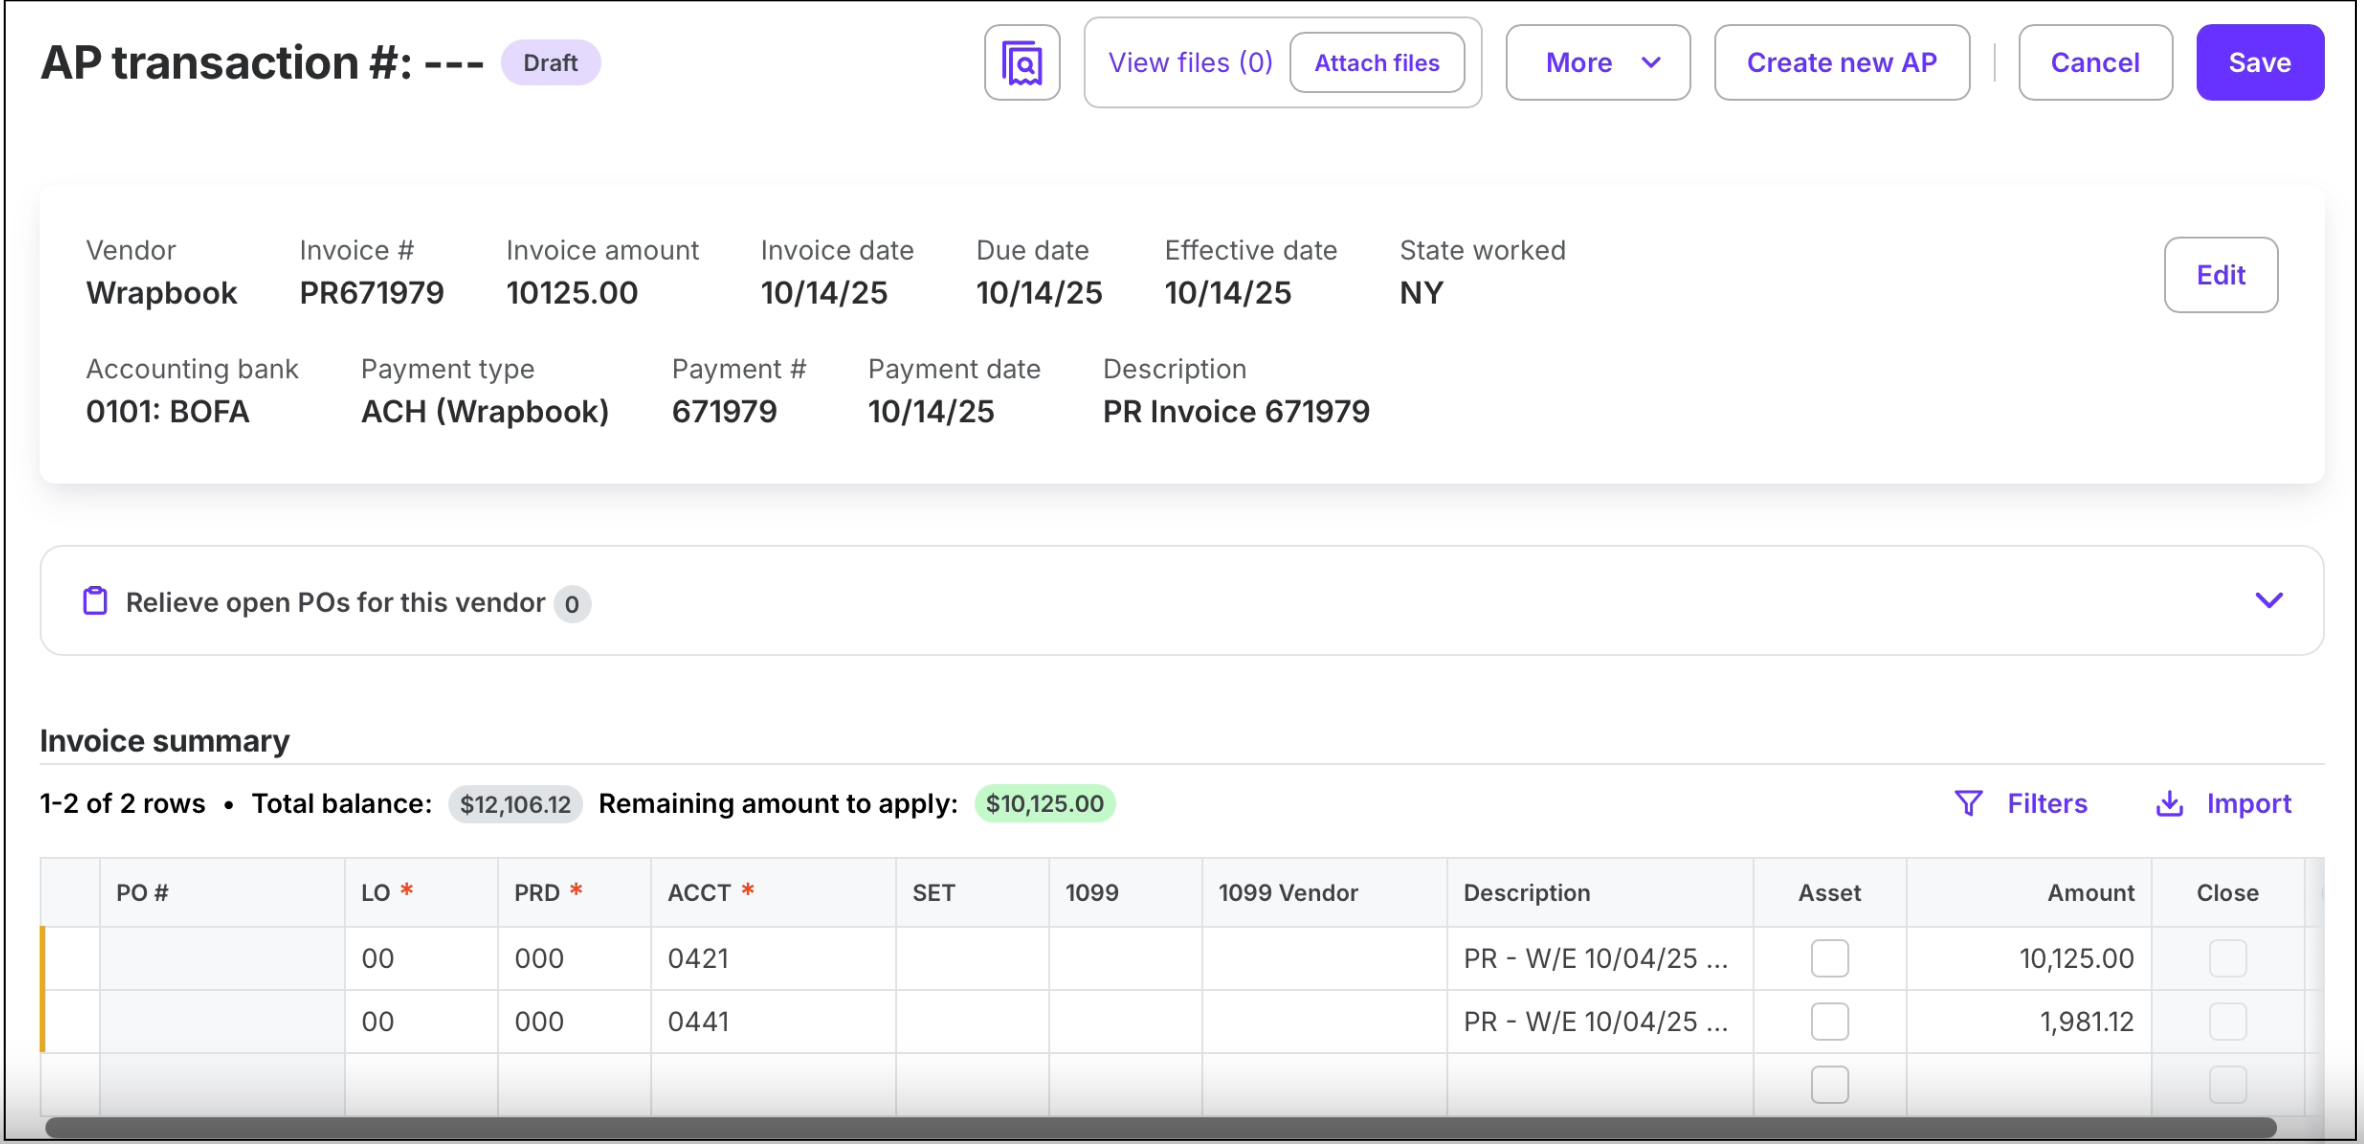
The details will carry over on the auto-generated AP or JE transaction in Wrapbook
Company
The Company setting in Project settings, Accounting is useful when projects have multiple investors who need detailed reports on how their specific contributions are being used, while maintaining confidentiality between different funding sources.
When a project has multiple funding sources that need to be tracked separately, you can use this setting to:
Designate a default accounting company tag for all transaction types, 1099 reporting, MICR AP checks, and reports
Link payroll settings to specific accounting company tags to ensure costs are properly associated
Generate reports for single or multiple accounting companies, including: the General Ledger and cost report
When only one accounting company exists, the system will automatically apply it to all transactions without requiring manual selection.
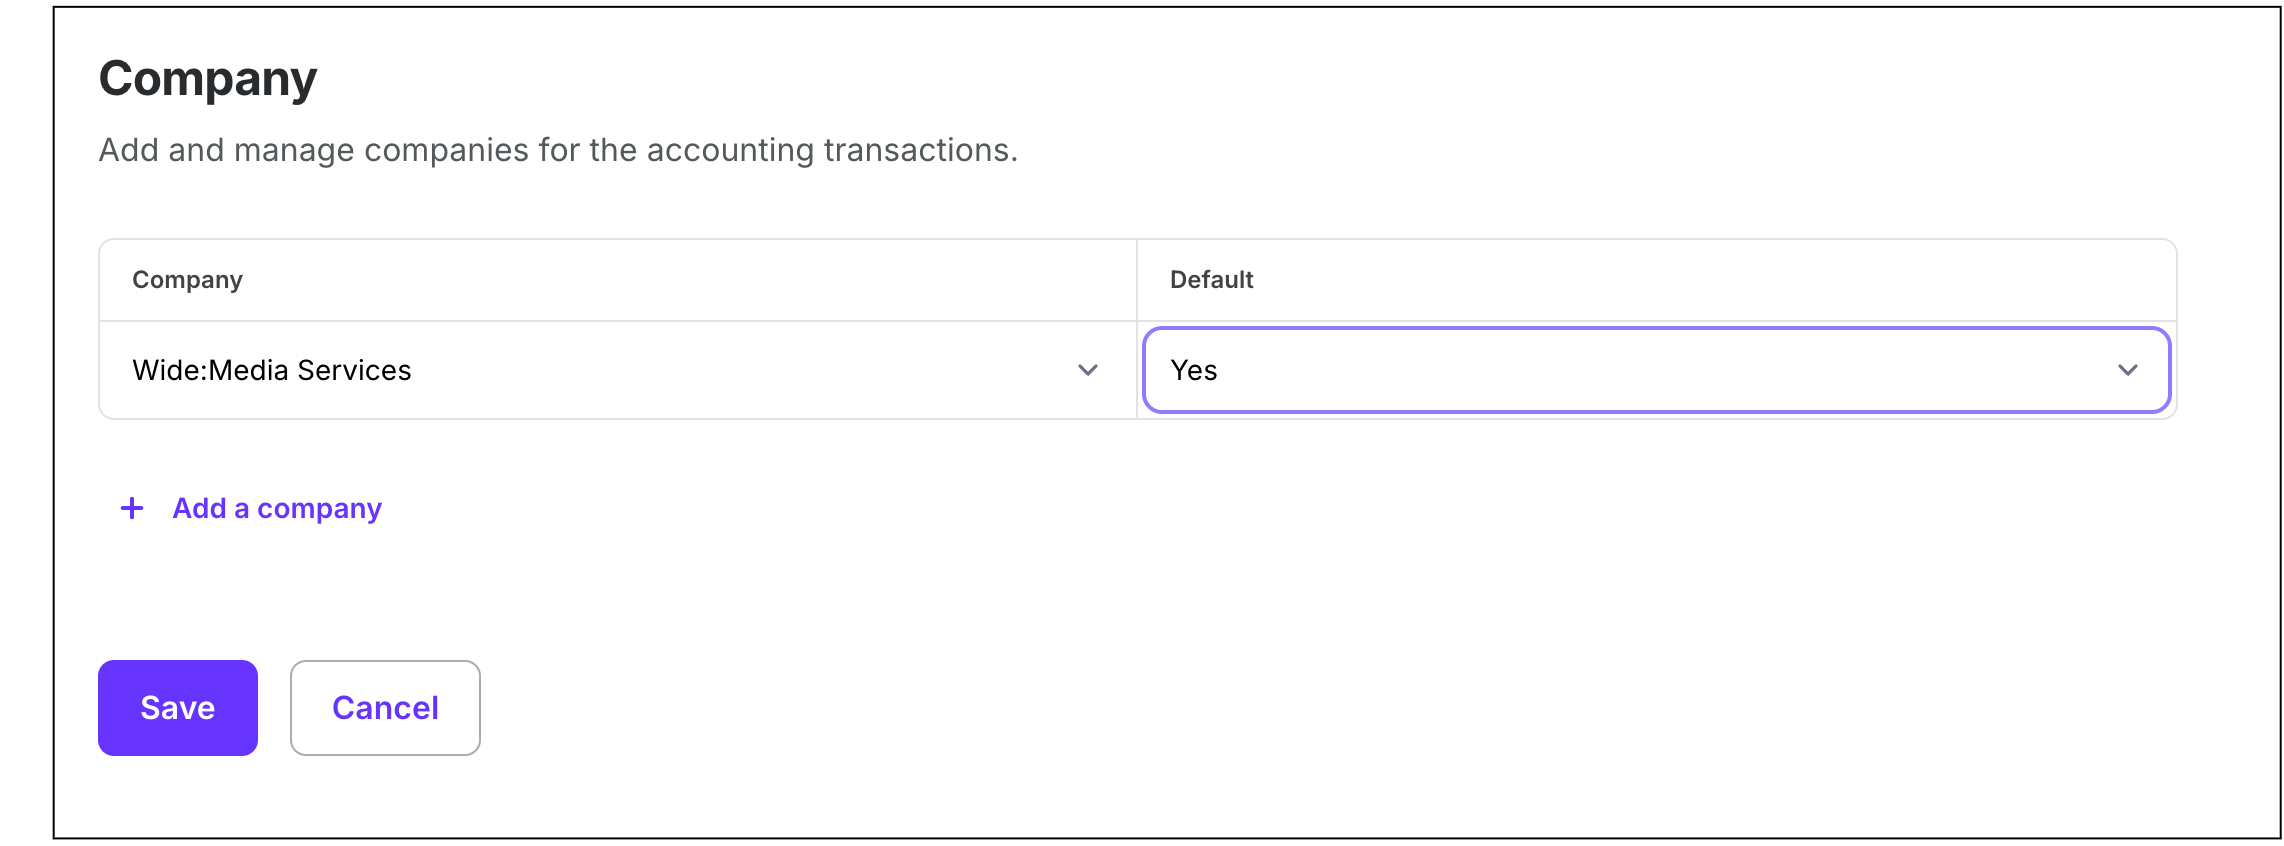
Example of the Company page in Project settings/Accounting
Accounting preferences
In PAS, the Accounting preferences setting controls how information is rendered in your production accounting reports. You can use this setting to display reports in all uppercase.
To display production accounting reports in ALL CAPS:
Click the Manage button next to Accounting preference
Next to Capitalization, click the toggle to enable Display in all uppercase
If you make changes to your Accounting preferences, be sure to click the Save button before leaving the page

Example of the Accounting preferences page in Project settings/Accounting
Coding rules
In PAS, the Coding rules is where you can assign default account and tag codes at the project level.
See how to set up default coding rules for vendor transactions.
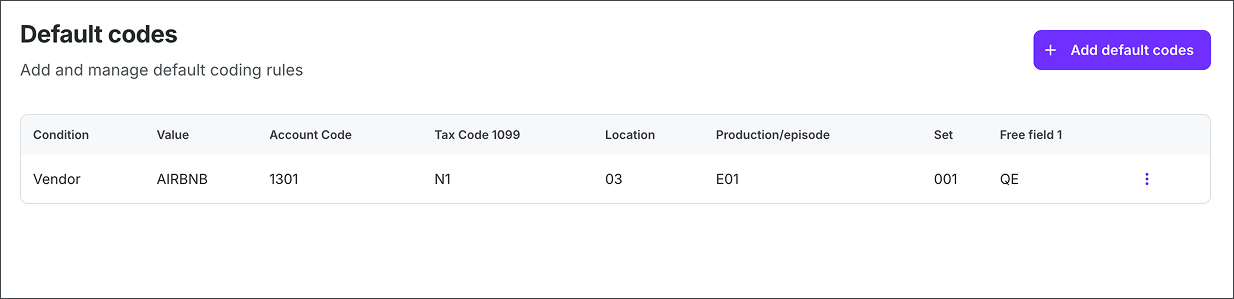
Example of a project’s Coding rules settings
Chart of accounts
Format
Defines the format for account numbers, ensuring consistent entries and reporting
Once saved, this format cannot be changed
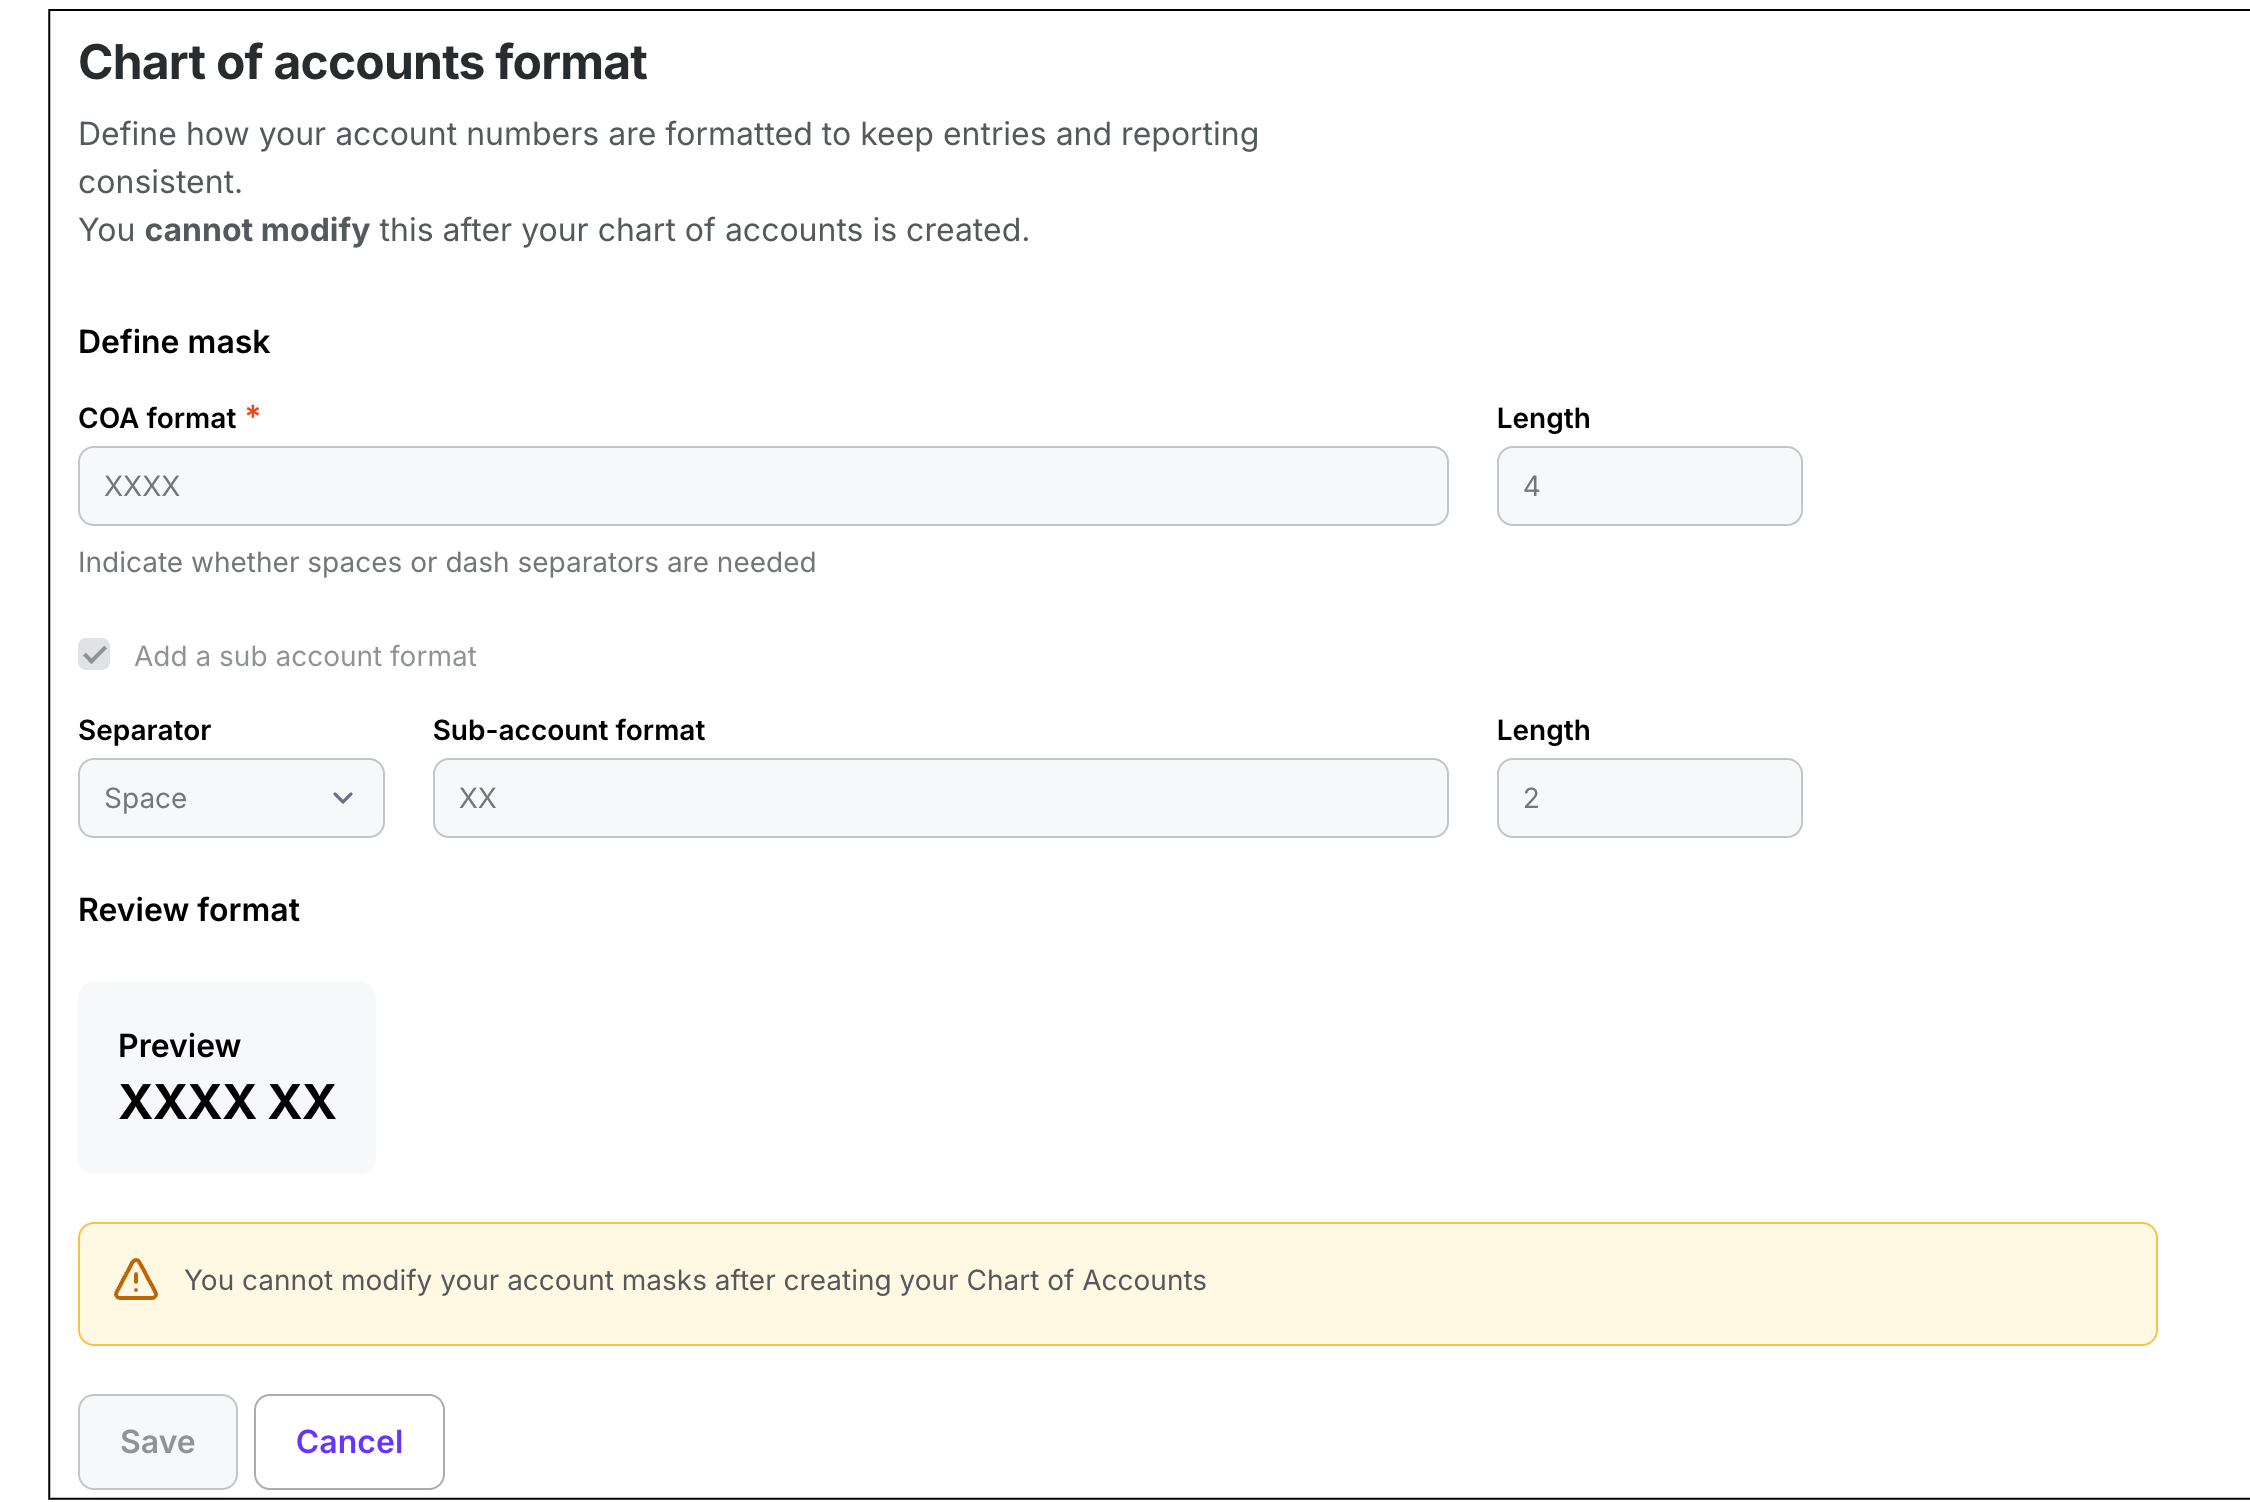
Example of the Chart of accounts format page in Project settings/Accounting
Ranges
On this page you can define the ranges for three types of accounts: Assets, Liabilities, and Expenses. Each account type needs a specific number range. For example, Assets accounts might use the range 1000-1999. This setup is crucial and cannot be changed later, so make sure to review everything carefully before saving.
When setting up ranges, be aware of the following:
Ranges cannot be accessed until the Chart of accounts format page is set up
You’ll need to leave enough room in each range - typically allow for at least 100 account numbers (for example, 1600-1699)
If you’re using an incomplete range, extend it to accommodate future accounts (for example, if range is 0101-0120, define it as 0100-0199)
After setting up ranges, you can import a Movie Magic budget file to build your Chart of Accounts based on these defined ranges
If you click the COA entry button, he Chart of accounts page in Project settings, Accounting will open
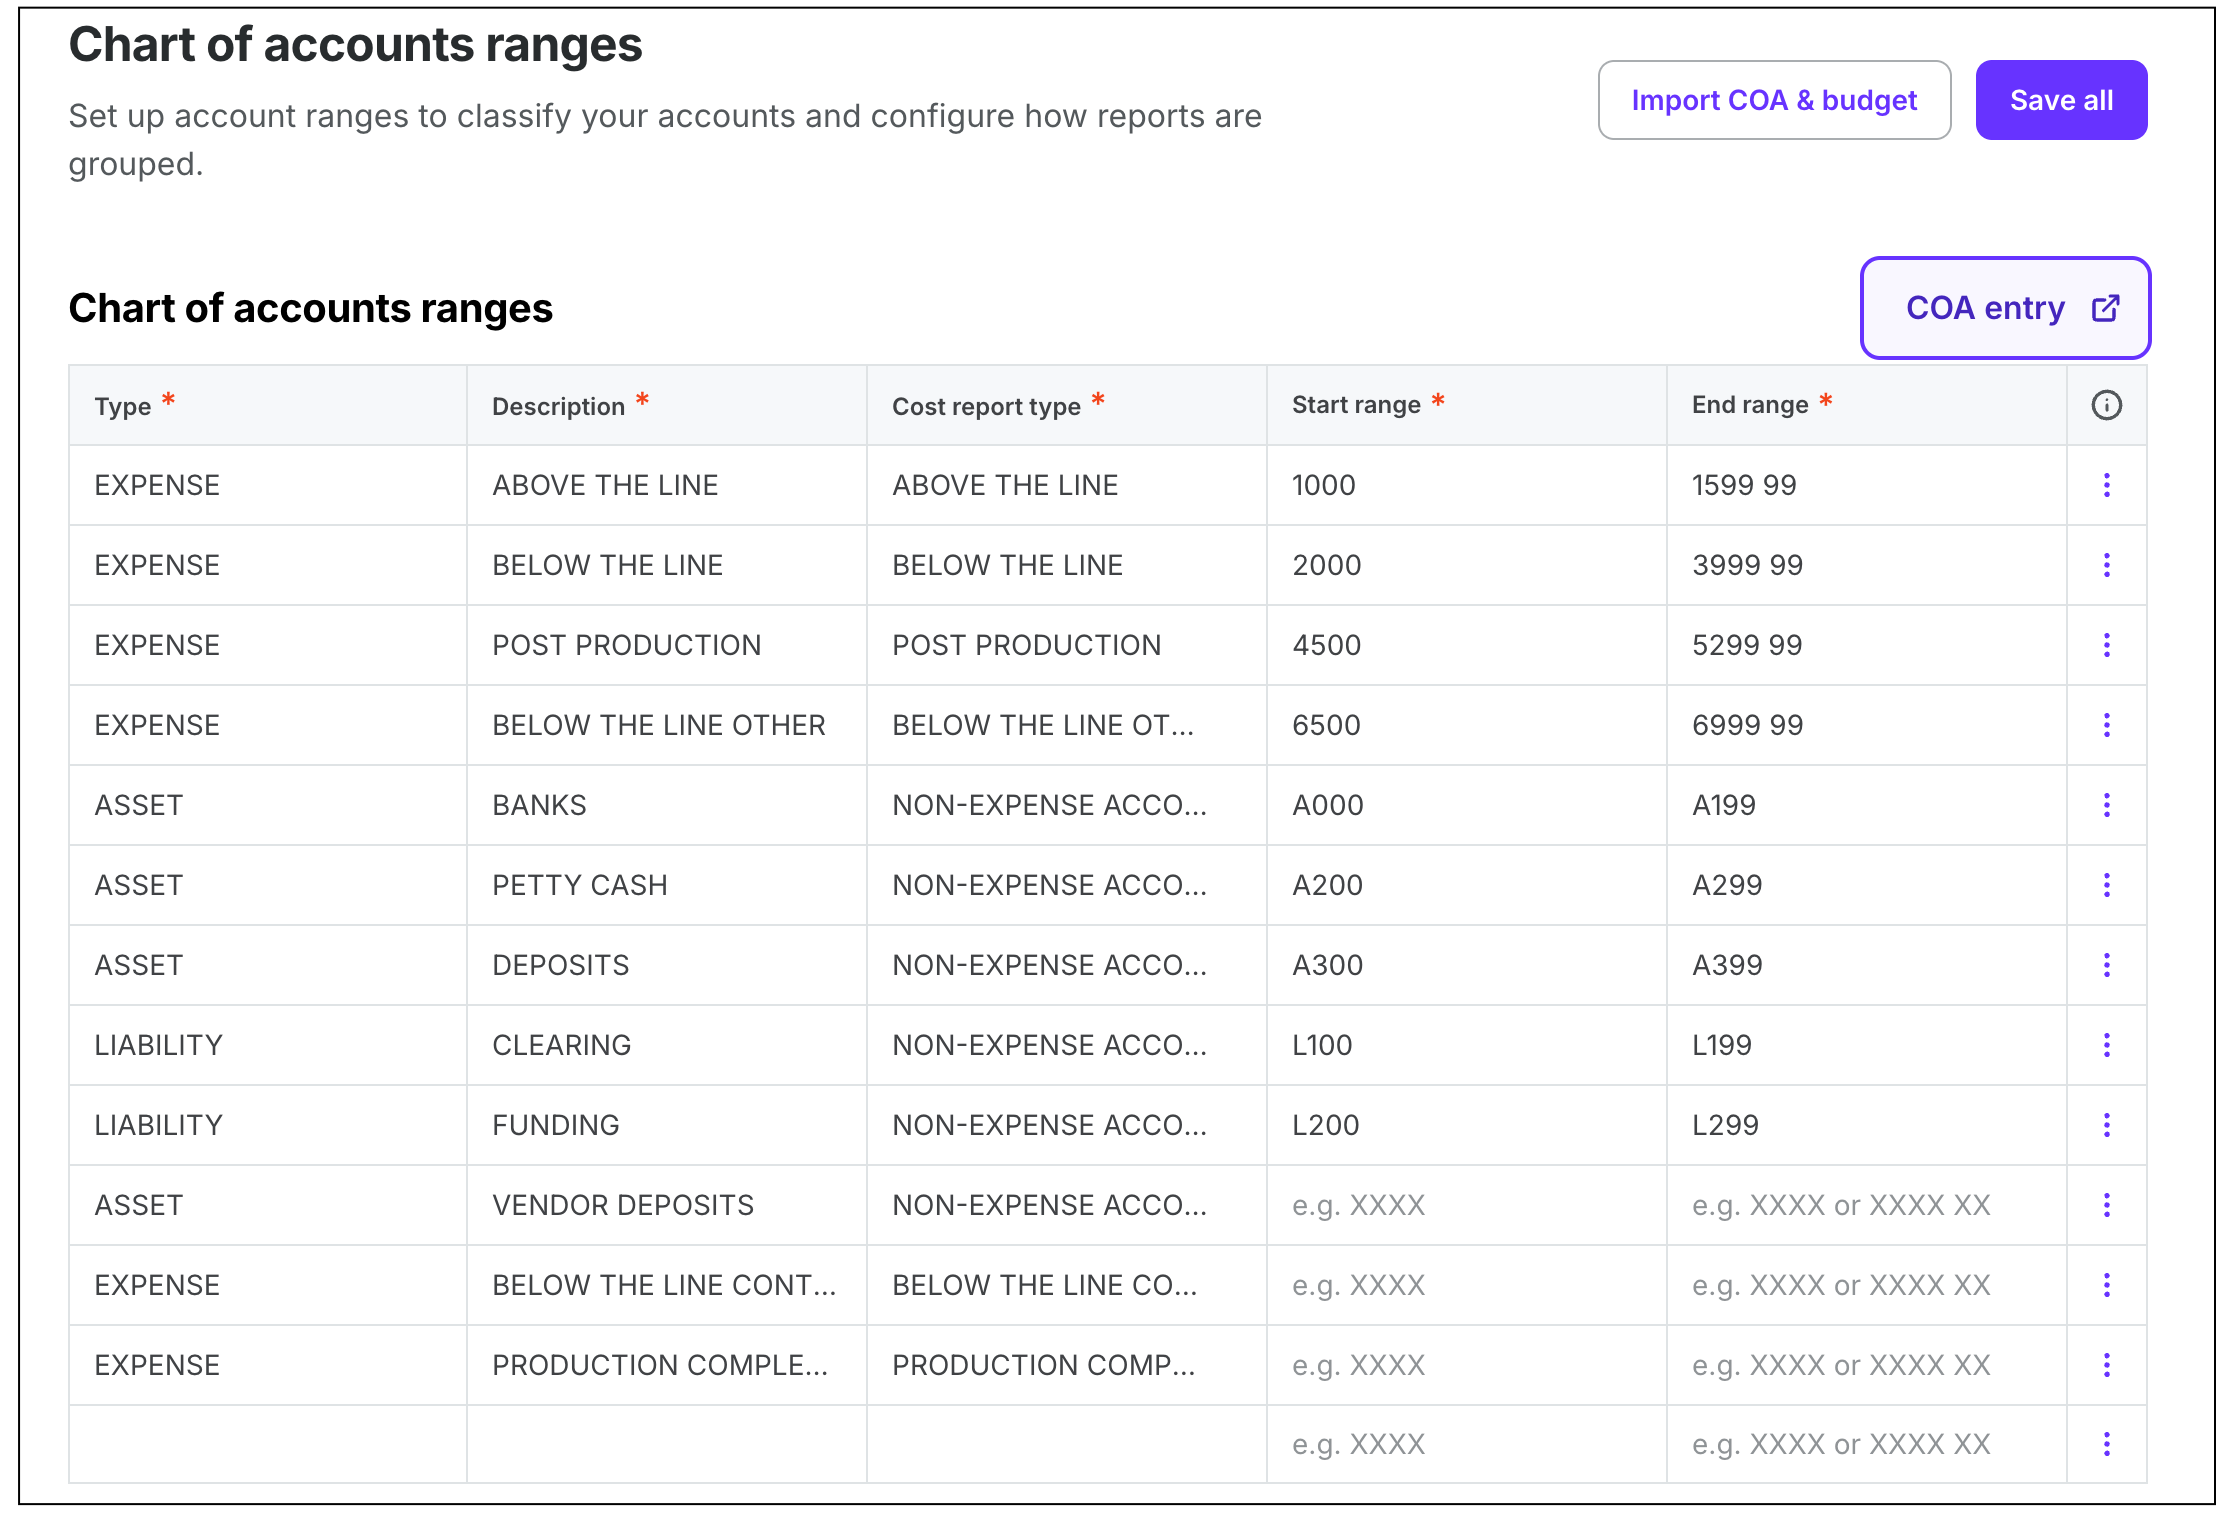
Example of the Chart of accounts ranges page in Project settings/Accounting
Chart of accounts
On the Chart of accounts page, you can set up your summary and detail accounts. On this page you can:
Click the Import button to import a Movie Magic budget file
Click the Export button to download a CSV file containing chart of accounts details
Click on a Description to make changes
Click the Manage link next to a Code to update Descriptions, deactivate codes
Click the three dots to add or remove lines from the chart
Click the COA ranges link to go to the Chart of accounts ranges page