Overview
The Web view of the General Ledger (GL) in Wrapbook is an interactive, real-time ledger interface within the Production Accounting Suite (PAS) that allows authorized company team members to view, filter, and analyze posted transactional activity directly in the browser.
Unlike the General Ledger Report, which is designed for generating downloadable PDF or CSV exports for formal reporting and sharing, the Web view is built for day-to-day operational review and workflow management.
In the Web view of the GL you can:
Review line-level details
Identify and manage distribution updates more efficiently without generating a report file
How to access the GL Web view
To see the Web view of a project’s General Ledger:
In the left-side navigation, click the dropdown menu and select the project
In the left-side navigation, click to expand the ACCOUNTING menu, and then click Accounting reports
On the Accounting reports dashboard, click the Web button next to General ledger
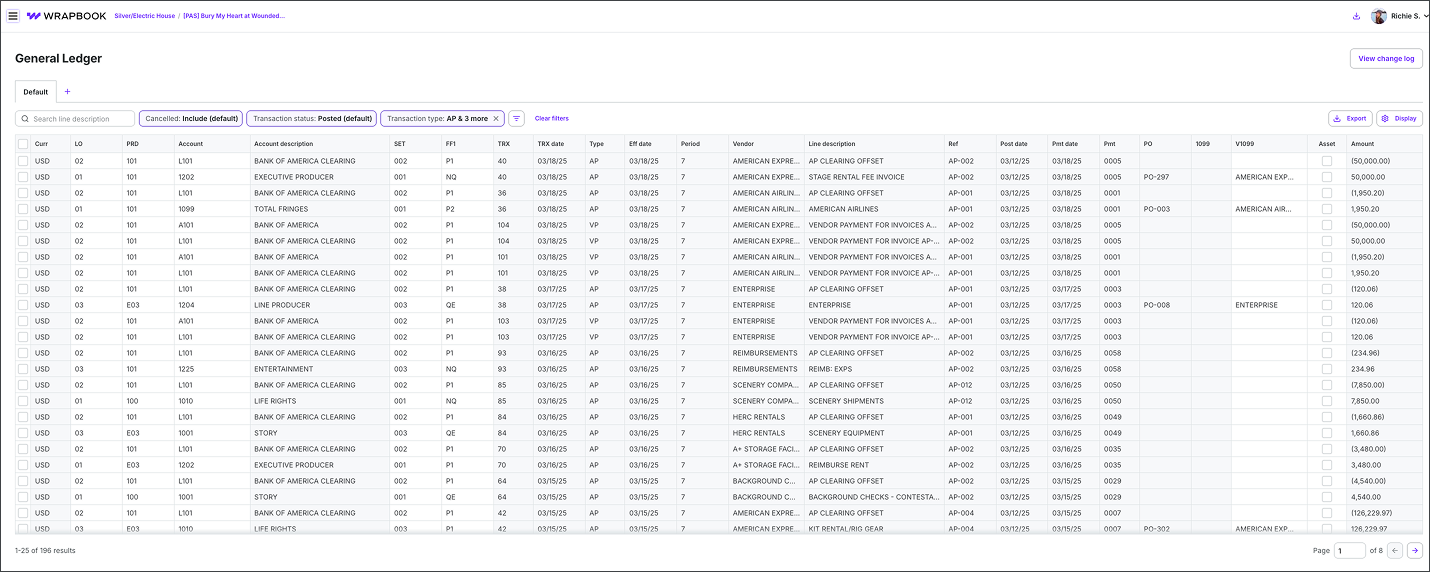
Example of the Web view of a project’s GL in Wrapbook
GL Web view actions
In the Web view of the GL, you can take the following actions:
View the change log: Click the View change log button to open a panel where you can review the audit trail of actions taken.
Create customized views: Click the + icon next to the Default tab. In the New view popup, enter a Tab name, and then click the Create tab button. To customize the view, click the filter button.
Rename, Duplicate, or Delete a custom view: Hover over the custom view tab until you see the arrow icon. Click the arrow icon, and then make your selection from the dropdown menu.
Export the GL to PDF, XLSX, or CSV: Click the Export button. In the Export drawer, enter the Report name, select the Report type (Detail or Summary), apply a Thousands separator (optional), select the Export format, and select the Page size. When you’re ready, click the Export button.
Customize the GL display: Click the Display button, to adjust columns shown, and the order they appear in. To hide/show columns, click Columns, and then click to check/un-check the boxes next to columns you want to display or hide. To reorder the columns, click Ordering and then make your selection.
Adjust the width of the columns: Hover over the lines separating the column headers until you see the double arrow and then drag the column to your desired width.
GL Web view filters
In the Web view of the GL, you can use the Search bar and the filters to limit your view to specific types of distribution lines.
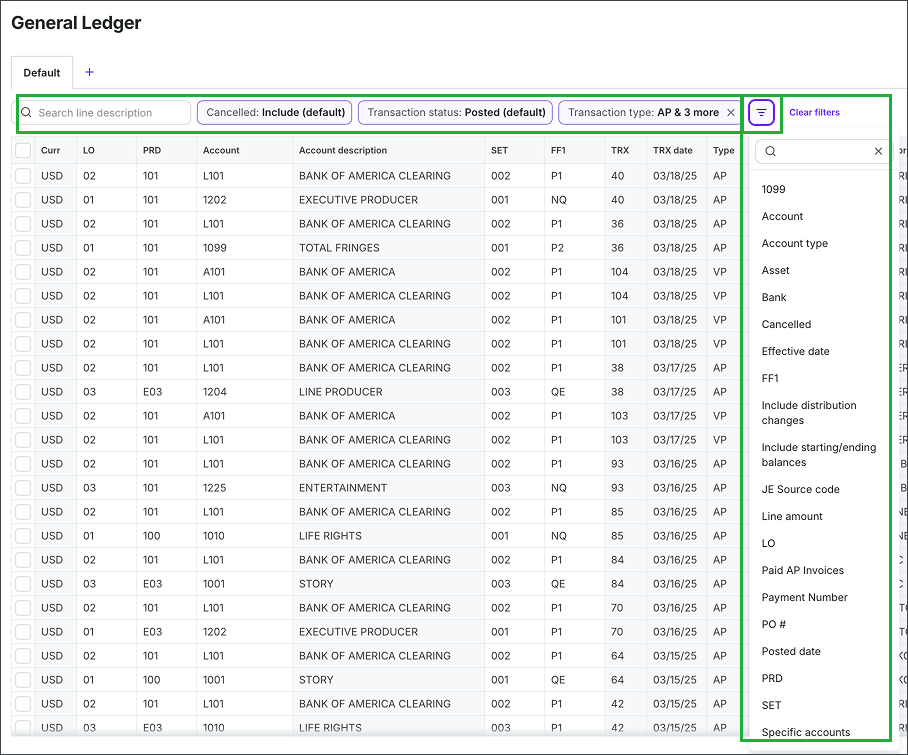
In the GL Web view, you can use the Search bar and filters to find the distribution lines that you want to update
Click the arrow to see the complete list of filters
Filter | Description |
|---|---|
1099 | Select transactions that have been assigned a US tax form 1099 tax code. |
From account / To account | Filter transactions by a chart of accounts range — select a starting and ending account to include only transactions that fall within those accounts. |
Account type | Filter by account classification: Asset, Liability, Expense, Income, or Equity. |
Asset | Choose whether to show transactions related to production assets. |
Bank | Filter transactions associated with a specific bank account. |
Cancelled | Choose whether to Include (default), Exclude, or show Only cancelled transactions. |
Eff date | Filter transactions based on the effective date (start and end date range). |
FF1 | Select from your customized Free Fields |
Include distribution changes | Check to display distribution changes made to transactions. Uncheck to hide them. |
Include starting/ending balances | Check to display the starting and ending balances for the selected period range. |
Line amount minimum / Line amount maximum | Filter transactions based on their individual dollar amounts. |
Line description | Filter transactions by a specific line description — only transactions with a matching line description will be included. |
LO | Filter by work location tag. |
Paid AP invoices | Filter to show Accounts Payable invoices that have been paid. |
Payment Number | Filter by specific vendor payment reference numbers. |
Payment start date / Payment end date | Filter paid AP transactions to a specific date range based on when the payment was made. |
From pmt / To pmt | Filter transactions by paid AP invoices payment number range — enter a starting and ending payment number to narrow results to a specific set of payments. |
From PO# / To PO# | Select a range of purchase orders based on their reference number. |
Posted start date / Posted end date | Filter transactions based on when they were posted to the General Ledger. |
PRD | Filter by production or episode tag. |
Ref | Filter transactions by reference number — enter a reference to find transactions associated with a specific payment or record. |
SET | Filter by set tag. |
Specific accounts | Select individual account codes instead of a numeric range. |
From trx / To trx | Select a range of transactions based on their reference number. |
Transaction start date / Transaction end date | Select the date range of transactions to display |
Transaction status | Filter by Posted (default), Unposted, or All statuses. |
Type | Filter by transaction type: Accounts Payable (AP), Distribution Change (DC), Journal Entry (JE), Payroll (PR), Vendor Payment (VP), Open Purchase Order (Open PO), Petty Cash (PC), and PCard (PX). |
V1099 | Select vendors with US tax form 1099 status. |
Vendor | Select specific vendors to include in the report. Vendors must be added on the Vendors page before they appear as options. |
How to make bulk edits to the General Ledger in Web view
In the left-side dropdown menu, select the project that the GL belongs to
In the left-side navigation, expand the ACCOUNTING menu, and then click Accounting reports
Next to General ledger, click the Web button
In the GL Web view, you can use the Search bar and filters to find the distribution lines that you want to update
Click the checkboxes to select the distribution lines that you want to bulk edit, and then click the Bulk edit button at the bottom of the GL
In the Bulk edit popup, click the dropdown menu next to Change to select what you want to update in the distribution lines. Then click the box next to it to select the change to be made.
When you’re ready, click the Apply button
After you click Apply:
Wrapbook updates the selected distribution lines immediately in the GL
The changes are reflected in real time in the Web view of the GL, allowing you to review the updated account coding, tags, or other modified fields directly on screen
If the filter Type - DC is applied, you’ll also be able to see the distribution update activity in the ledger results
These updates impact reporting going forward, meaning any newly generated General Ledger Reports, Trial Balance Reports, or Cost Reports will reflect the revised distribution details.
.png)
In the GL web view, you can use the Search bar and filters to find the distribution lines that you want to update
.png)
Click the checkboxes to select the distribution lines that you want to bulk edit, and then click the Bulk edit button at the bottom of the GL.
.png)
In the Bulk edit popup, click the dropdown menu next to Change to select what you want to update in the distribution lines. Then click the box next to it to select the change to be made. When you’re ready, click the Apply button.
Important considerations when using the GL Web view
While working in the Web view of the GL, it’s important to be aware of the following:
The Web view reflects live ledger data
The Web view displays real-time transactional activity. Any distribution changes you apply will immediately impact how transactions appear in:
If you’re working mid-close or mid-reporting cycle, be sure you understand how bulk edits will affect downstream reporting.
Distribution edits do not change source transaction amounts
Bulk edits in the GL update distribution coding (such as account, tags, or other distribution fields), but they do not change:
The original transaction amount
The vendor
The transaction type
The underlying AP invoice, Payroll, JE, or Vendor Payment record
If you need to modify the original transaction itself, you must do so from its source module (for example: AP invoices, Journal entries, Payroll, etc.).
Use filters strategically before bulk editing
Before applying bulk edits:
Narrow your results using Effective date, Transaction type, or ACCT
Confirm that Transaction status is set appropriately (for example, Posted vs All statuses)
Use Include distribution changes if you need to review prior updates
This helps prevent unintended edits across periods, vendors, or account ranges.
Review distribution changes for audit clarity
If you're performing re-classes or correcting coding:
Enable Include distribution changes to see historical distribution updates
Review credit entries using TxCR when validating balancing entries
Confirm totals before and after edits to ensure accounts remain balanced
This is especially important during:
Period close
Audit prep
Budget vs. actual review
Tax incentive or cost certification workflows
Web view vs. GL Report: when to use each
Use the Web view when you need to:
Investigate transactions
Re-class or correct distributions
Perform operational clean-up
Review activity quickly without exporting
Use the General Ledger Report when you need to:
Generate a formal deliverable
Share reports with production, studio, or auditors
Export to PDF or CSV
Archive period activity