Vendors is permission based
To update, your account must have one of the following roles enabled:
Role: Company Admin, Company Manager
Custom role with: Accounting & Cost Tracking: Vendors - Full access, Project access
Overview
Use this article to update vendor information and manage vendor records in Wrapbook. You’ll learn how to edit a vendor’s details, including the global default 1099 code that can apply to new transactions across projects, and how to promote a project-level vendor to the company level.
If Wrapbook identifies a duplicate vendor during promotion, this article also explains why the promotion may be unavailable and where to go for help combining duplicate vendor records.
How to update vendor information
To update vendor information:
Go to the All vendors dashboard
On the All vendors dashboard, click the menu button (⋮) next to the vendor record you want to update, then select Edit
Note: Clicking a vendor's name opens that vendor's transaction list. To edit vendor details, use the menu button instead.
On the Edit vendor page, click the fields you want to update and make your changes
When you're finished, click the Save button
How to update a vendor’s global 1099 code
On the Edit vendor page, scroll to Default codes
Slick Add default codes, and select a value from the Tax code 1099 dropdown
Select No default 1099 code to remove the global default
The selected global code applies to new transactions for the vendor across all projects, unless a project-specific 1099 code is assigned. A project-specific code takes precedence. For more information, see Set up default coding rules for vendor transactions (PAS).
Promote a project vendor to the company level
Vendors is permission based
To update, your account must have one of the following roles enabled:
Role: Company Admin, Accountant, Company Manager
Custom role with: Accounting & Cost Tracking: Vendors - Full access
In Wrapbook, you can move a vendor record created at the project level to the company level so the information can be accessed by authorized team members on any company project.
Here’s how:
Go to the All vendors dashboard
On the All vendors dashboard, scroll, search, and/or apply filters to find the vendor record
Click the three dots next to the vendor record, and select Promote to company level
In the Promote vendor to company level popup, click the Confirm button
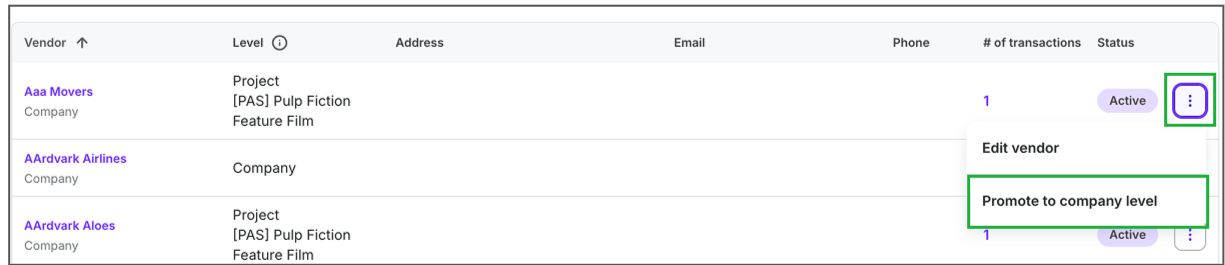
On the All vendors dashboard, click the three dots next to the project-level vendor that you want to promote and then click to select, Promote to company level
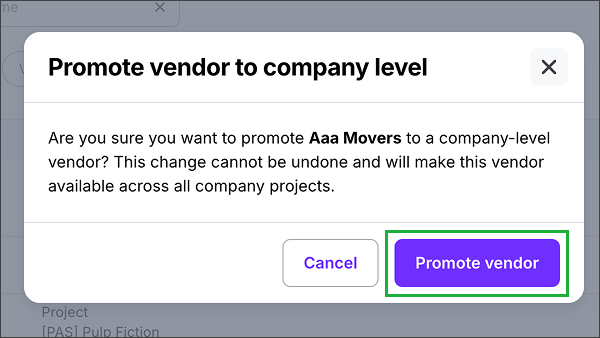
In the popup confirmation, click Promote vendor
Managing duplicate vendor records
In Wrapbook, vendors created at the project level are scoped to that project and don’t replace or modify any existing company-level vendor record for the same vendor.
If a duplicate vendor record is detected when trying to promote a record from the project level:
You won’t be able to select Promote to company level
An alert will tell you This vendor cannot be promoted because it has the same TIN/EIN as another company vendor
To combine the vendor records, see Merging duplicate vendors.
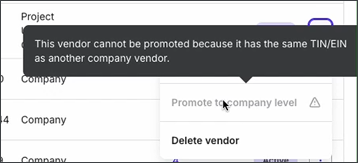
An alert will notify you if the vendor already exists at the company level