Overview
If a worker has an agent, you can add the agent when inviting the worker to a project. Doing this allows the agent to manage their client’s onboarding process and receive payments on behalf of their client.
Payment Authorization Forms
When you invite a represented worker to a project, you're required to confirm that you've received a Payment Authorization Form (PAF) from their agent. You can do this two ways:
Attestation only: Check the box confirming you've received the PAF. You can store the physical document outside Wrapbook
Upload the PAF into Wrapbook: Optionally attach the file directly to the worker's record in Wrapbook. Supported file types: JPEG, PJPEG, PNG, X-PNG, TIFF, HEIC, HEIF, and PDF. Max file size: 20MB.
Uploaded PAFs are accessible from the worker's profile at any time and can be viewed, downloaded, or deleted
Setting up a worker with an agent
The option to add a worker’s agent is available when you invite the worker to a project.
How to invite a worker with an agent:
In the left-side navigation, click the dropdown menu
In the dropdown menu, select the project that you’re inviting the worker/agent to
In the left-side navigation, click People
On the project’s People dashboard, click the Invite worker button
Choose Existing worker or New worker. In Wrapbook, an Existing worker is someone that has worked for your production company before.
Enter the required information
In the Agent information section, select Yes under Is this worker represented by an agent?
Enter the Agent email
Check both confirmation checkboxes:
I confirm that this agent is authorized to use Wrapbook on behalf of the worker
I confirm that I have received an accurate Payment Authorization Form from this agent
Optional: Upload the Payment Authorization Form — drag and drop the file or click Browse Files. Supported types: JPEG, PJPEG, PNG, X-PNG, TIFF, HEIC, HEIF, PDF. Max 20MB.
Optional: Add the Agent fee (%) — the fee is taxed as worker wages. You can apply an agent fee without adding the agent's email.
In the Onboarding section, select who will complete the worker's onboarding:
Worker — the worker receives an invitation and completes their own onboarding (What the worker fills out: Personal tax information, Document signatures, Payment methods)
Production company — a production company admin completes the worker's onboarding details in Wrapbook directly (see When the production company will complete the worker’s onboarding below)
Worker's agent — the agent receives the invitation and completes onboarding on the worker's behalf (What the agent fills out: Client's tax information, Document signatures, Agency payment method). This option is disabled until an agent email is entered.
Complete the rest of the form and click the Submit button
Note: If this worker is being added to a second deal and their agent is already on record, Worker's agent will appear pre-selected and disabled. A tooltip explains: The agent must onboard the worker for this deal since they handled onboarding for the first deal.
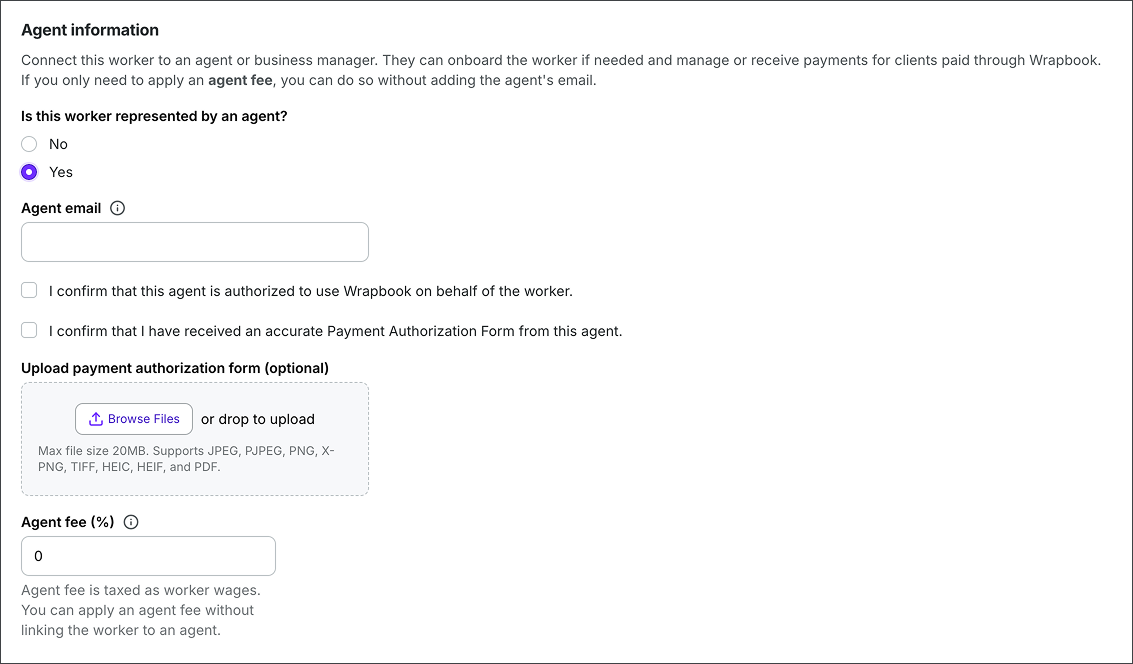
On the project invitation, under Agent information, click to choose Yes, then enter the Agent email, click to confirm the attestations, upload a PAF, and enter the Agent fee
When the production company will complete the worker’s onboarding
When you select Production company in the Onboarding section, you'll fill in the worker's onboarding details — including personal details, tax forms, and payment method — directly in Wrapbook on their behalf.
During the onboarding flow, a banner gives you the option to hand off to the worker at any point. You can click Send onboarding to client to save your progress and send the worker an invitation to complete the remaining steps themselves.
What happens next
When you enable an agent for a worker, two invitation emails are automatically sent:
One to the represented worker's email address
One to their agent's email address
After the invitations are sent, the worker's profile shows an Onboarding details section on the right side with the following status items:
Worker invited email — the email address the worker's invitation was sent to (editable until the worker adds their personal information or accepts the invitation)
Worker account — shows whether the worker has a Wrapbook account; includes a Resend invite email button
Agent invited email — the email address the agent's invitation was sent to (editable until the agent accepts the invitation); includes a Resend invite email button
Agent account — shows whether the agent has a Wrapbook account
Payment authorization form — shows Uploaded (with a View link) or Not on file (with an Upload form link if you haven't uploaded it yet)
Personal information and Payment information — show completion status
You can track the represented worker's onboarding status on the project's People dashboard.
Updating the agent email for a represented worker
If you need to update the agent email that has been added to a represented worker’s profile, you’ll need to reset the Agent information in the worker’s profile.
Here’s how:
In the left-side navigation, click the dropdown menu and select the project the represented worker is on
In the left-side navigation, click People
Click the View button next to the worker to go to their worker profile
On the worker’s profile in the Job & pay section click Edit
Scroll down to the Agent information section and click to uncheck the box next to This worker has an agent for this deal
Click the Save button
On the worker’s profile in the Job & pay section, click Edit
Scroll down to the Agent information section and click to check the box next to This worker has an agent for this deal
Enter the correct email for the agent, and then click to confirm the attestations, and enter the agent fee if applicable
Click the Save button
After you click the Save button, the agent’s email should be successfully updated.
Reviewing and responding to worker agent requests
Workers can request agent representation directly from their onboarding sidebar. When a worker submits a request, a production company admin must review and respond before the agent is added to the project.
Where to find pending agent requests
Pending agent requests appear in two places:
On the project’s People dashboard: An alert will appear for each worker with a pending request
In the Worker's profile (Job & pay section): An alert will show saying, Worker requests agent representation with the agent's email address. From here you can either click to:
Add agent
Reject request
Adding the agent (accepting the request)
On the worker's profile page, go to the Job & pay section
In the pending request alert, click Add agent
The worker's edit form opens, scrolled to Agent information, pre-filled with the agent's email. A banner will say: Confirm authorization and set an agent fee to finish. Contact [agent's email] if you need more info — click the email link to contact the agent before completing setup
Review the pre-filled information
Check both confirmation checkboxes (agent authorization + PAF received)
Optionally, upload the Payment Authorization Form
Set the agent fee, if applicable
Click the Save button
Once saved, the action item clears from the project’s People dashboard. The worker is notified that their agent has been added.
Rejecting the request
On the worker's profile page, go to the Job & pay section
In the pending request alert, click Reject request
In the Reject agent request popup, enter your reason under Reason for rejection (required)
Click the Send rejection button
The worker will receive a notification with your reason as a dismissible alert the next time they log in. They can dismiss it and submit a new request if needed.
Note: If you reject a request, the worker must complete their payment method setup directly.
Payee format options for mailed checks
When an agent is added for a worker, the agent will be able to enter payment information and choose how the payee line will appear on checks.
The format options for the payee line on checks depend on how the worker has been classified as an employee or a loan out.
Employees
When the represented worker is classified as an employee, the agent will be able to choose one of these formatting options:
[Employee Name] C/O [Agency Name]
[Agency Name] C/O [Worker Name]
Loan-out corporations
For loan-out corporations, check payee lines are always formatted as:
[Agency Name C/O Loan-Out Corporation Name]
Remember: In Wrapbook, payments to agents are sent via mailed paper checks. Represented workers can only use direct deposit to receive payments if they make this selection directly in their Wrapbook account.
How payments to represented workers are taxed
In Wrapbook, when choosing to add an agency fee to a represented worker’s pay, the fees are paid as a percentage increase to the worker’s gross wages and therefore taxable per the worker type.
If the represented worker is a SAG member, SAG will expect these fees to be on payroll and taxed
Tax reporting follows the tax ID (SSN or EIN) on the worker’s profile
If the represented worker is paid as a W‑2 employee, Wrapbook withholds and remits payroll taxes and issues a W‑2 to the worker at year‑end
In most cases when a represented worker is paid as a loan-out or contractor, Wrapbook does not withhold tax. In these cases, Wrapbook issues a 1099 to the represented worker at year-end.
If the represented worker has their own Wrapbook account, they can access these documents from their Tax Documents dashboard
What to tell agents before payroll runs
When you add an agent fee to a represented worker's deal, it's important to confirm that the agent understands how fees are structured in Wrapbook before the worker's first payroll is processed. Many agents assume agency fees are paid as an untaxed flat amount on a separate check — in Wrapbook, this is not how it works.
Key points to communicate to the agent:
The agent fee is added as a percentage increase to the worker's gross wages and is taxed as part of those wages — not paid separately
The full gross amount (worker wages + fee) is issued as a single mailed paper check — not two separate payments
Taxes are calculated on the full gross amount, including the fee
Tax reporting follows the tax ID on the worker's Wrapbook profile, not the agent's
If the agent prefers a different arrangement:
Agents are not required to use Wrapbook's fee feature. If an agent would prefer to receive their fee directly from production outside of Wrapbook, they can do so — simply do not enter an agent fee in the worker's deal. The agent and production can arrange the fee payment separately.
Note: This conversation must happen before payroll is processed. Once a payment has been issued with the fee included, stopping or reversing it delays funds for the worker and creates additional work for your team. If a check cannot be stopped, a reversal may still be possible, but the taxed portion of the payment cannot be returned.
If an agent contacts you after payroll has already run with questions about their fee, direct them to Wrapbook Support for next steps on whether a reversal is possible.