Overview
Approval workflows in Wrapbook replace manual approval chains — like email threads or paper forms — with a streamlined, trackable process inside the platform.
They let your team review and approve items before they’re finalized, ensuring compliance and visibility across departments.
Approval workflows help your production:
Automate multi-step approvals
Assign approvers by role or individual
Route documents based on project or department
Track approval progress in real time
Reduce manual follow-ups and missed sign-offs
In Wrapbook, you can create approval workflows for:
Worker-submitted purchase orders
Timecards & expenses
Startwork packets
Vendor payments
Approval workflow requirements
In order to use an approval workflow in Wrapbook, you’ll need to:
For startwork, ensure each document has signature fields for all required approvers
Access Approval workflows
Approval workflows are permission based
To update, your account must have one of the following roles enabled:
Role: Company Admin
Custom role with: General settings - Full access, Production entities - Full access, Manage
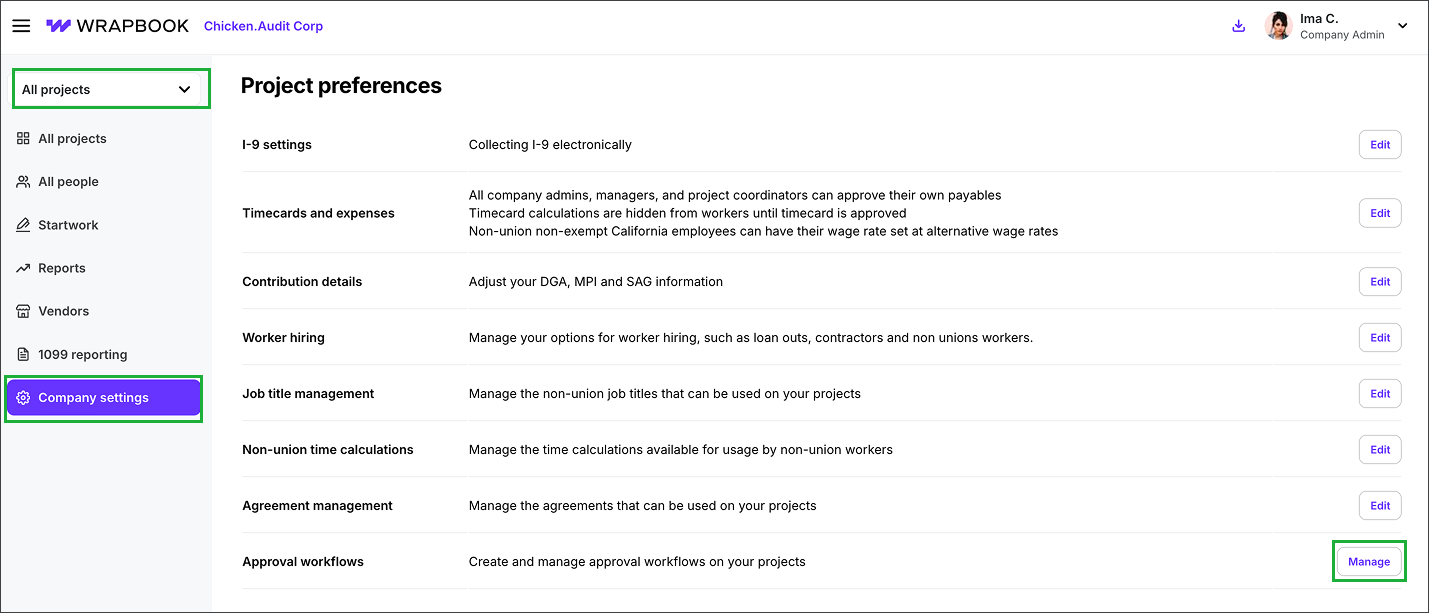
How to access approval workflows:
In the left-side navigation, click the dropdown menu
In the dropdown menu, select All projects
In the left-side navigation, click Company settings
Scroll down to Project preferences
Click the Manage button next to Approval workflows to go to the company-level Approval workflows management page
Select All projects, click Company settings, scroll down until you see the Project preferences section, and then click the Manage button next to Approval workflows
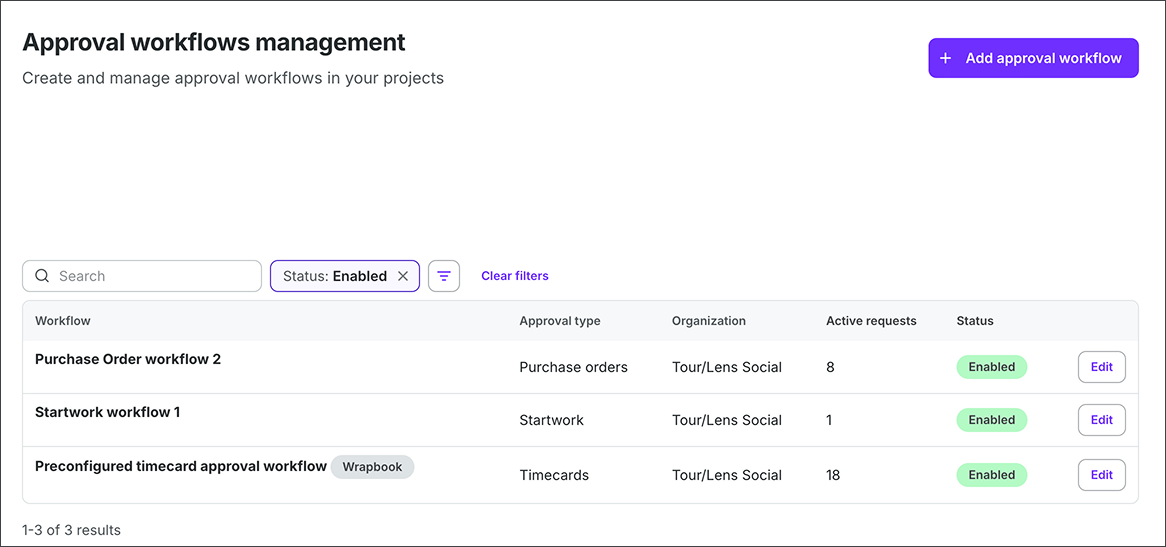
Example of a company’s Approval workflows management page in Wrapbook
Create an approval workflow
Use the following steps to create a new approval workflow:
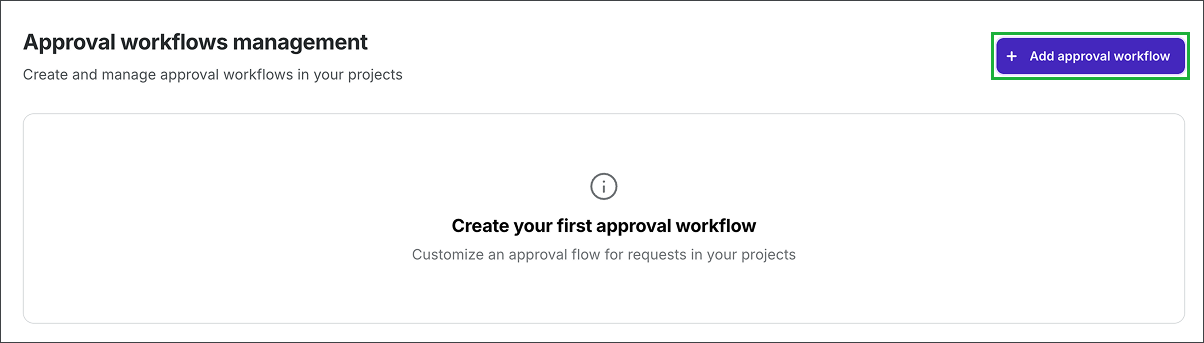
On the Approval workflows management page, click the + Add approval workflow button
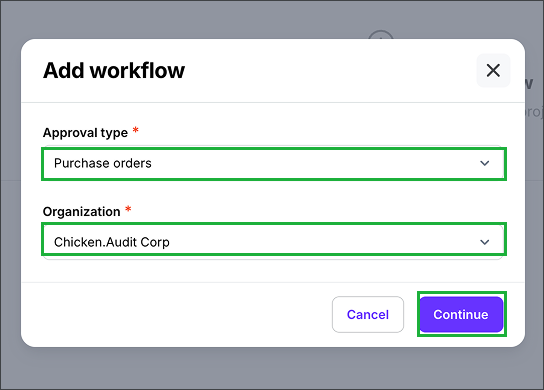
In the Add workflow popup, click the Approval type dropdown menu to select the type of approval workflow you want to create: Purchase orders, Timecard & expenses, Startwork, or Vendor payments
If your company has an organizational hierarchy setup in Wrapbook, you can click the Organization dropdown to select the one that will have access to the workflow
By default, your company will be selected as the organization. This means that you won’t have to update this option if your company doesn’t use an organizational hierarchy.
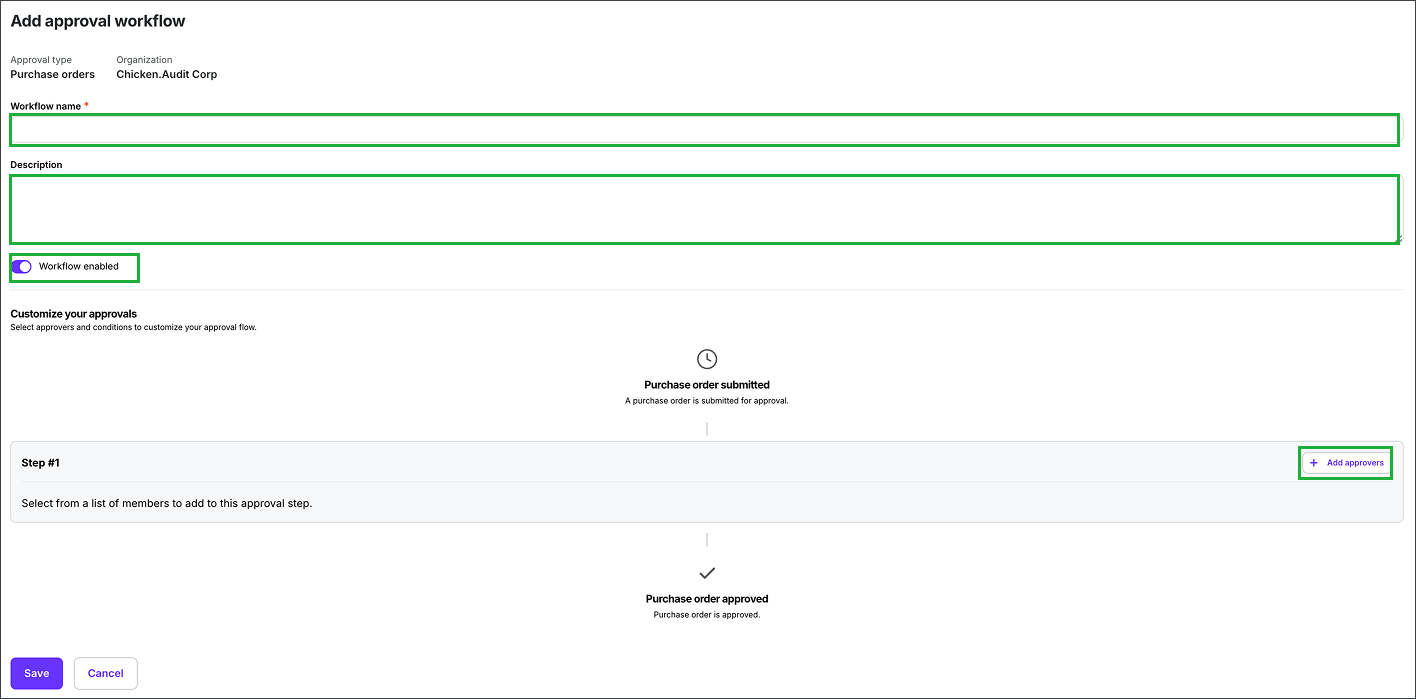
On the Add approval workflow page, enter a Workflow name and optional Description
Optionally, click to toggle on/off Workflow enabled
On means the workflow will be turned on for approvers once you click the Save button
Off means that the workflow won’t be turned on for approvers once you click the Save button. If you toggle off, you’ll be able to return to the Approval workflows management page to toggle it on once the workflow is saved.
On the Approvals workflows management page, you can show or hide disabled workflows
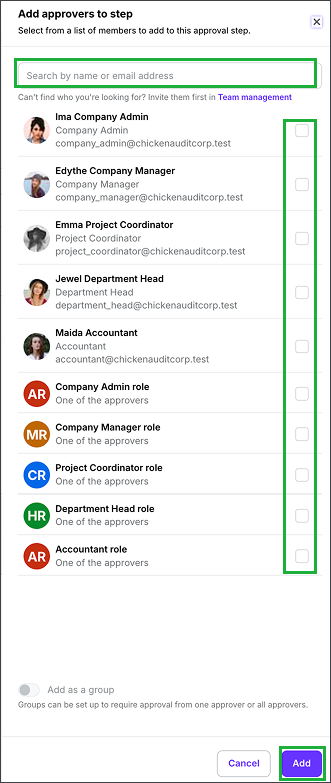
In Customize your approvals section, click + Add approvers button in Step #1 to open the selection drawer
In the Add approvers to step drawer, you can click the checkboxes to select the approvers by team member name or role
When you click to select a role, all team members within the organization that have been assigned to that role will be added as approvers
If you don’t see the person that you want to add as an approver, click the Team management link to invite them. Once they accept their invitation, their name will appear in the drawer.
Optionally, you can create an approval group, that you can reuse when creating approval workflows in the future
Once you’ve made your selections in the drawer, click the Add button
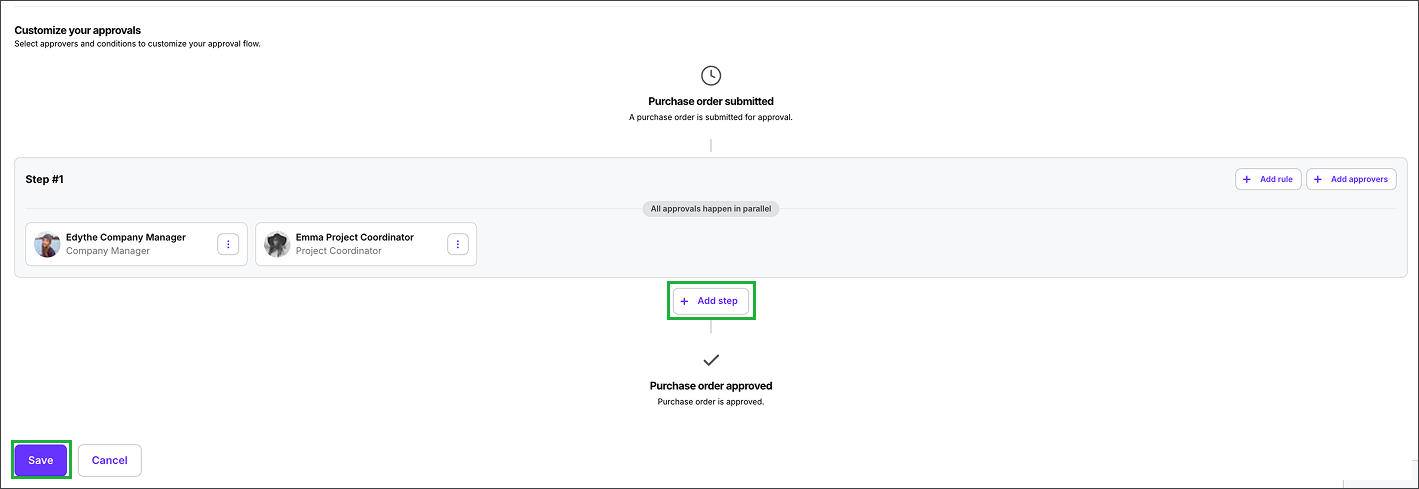
The approval workflow step will now display the selected approvers
To add additional team members to the step, click the + Add approvers button
To add a rule to the approval workflow step, click the + Add rule button
To add another round of approvals that will occur after all approvers in the previous workflow approval step have signed off, click + Add step button. This can be repeated as needed.
When your finished configuring all the steps in your approval workflow, click the Save button
.png)
Select All projects, click Company settings, scroll down until you see the Project preferences section, and then click the Manage button next to Approval workflows
Click the + Add approval workflow button
Click the Approval type dropdown menu to select the type of approval workflow you want to create, then click the Organization dropdown to select the organization that will have access to the workflow. Once. you’ve made your selections, click the Continue button.
Enter the Workflow name, and Description (optional), click to toggle on/off Workflow enabled (optional), and then click the + Add approvers button
In the panel, you can use the Search bar to find team members. Click the checkboxes next to the team members that you want to include in the first approval step, then click the Add button.
To add another round of approvals, click the + Add step button. When you’re done configuring the approval workflow, click the Save button.
Workflow approval groups
Approval groups are pre-assigned sets of approvers who share responsibility for a workflow step.
You can choose whether:
All approvers must approve before advancing, or
Any approver can approve to move forward
Create an approval group
In the Add approvers to step panel, click the toggle next to Add as group
Enter a Group name
Under Require approval from, choose Any approver or All approvers
Click Add
The group is now saved and available for future workflows.
Update or delete an approval group
On the Approval workflows page, click the Approval groups tab
Click Edit next to the group
Update the information and click Save
To delete, click Delete group at the bottom of the page and confirm
Rules for approval workflow steps
When adding steps to an approval workflow, you’ll have the option to set conditional rules that determine how the workflow should progress.
How to set up rules for approval workflows
When adding a step to an approval workflow, click the Rule button
In the Add rule popup, you have the following options:
When…
When you click to select a role, all team members within the organization that have been assigned to that role will be added as approvers
If you don’t see the person that you want to add as an approver, click the Team management link to invite them. Once they accept their invitation, their name will appear in the drawer.
Optionally, you can create an approval group, that you can reuse when creating approval workflows in the future
Click the dropdown menu to select all or any
Click the next dropdown menu to select the conditions. Note that the options in the dropdown menu are based on the the type of approval workflow you’re updating.
To create more than one condition groups, click + Add condition and then make your selections from the dropdown menus
When you’re finished setting up the rule, click the Apply button
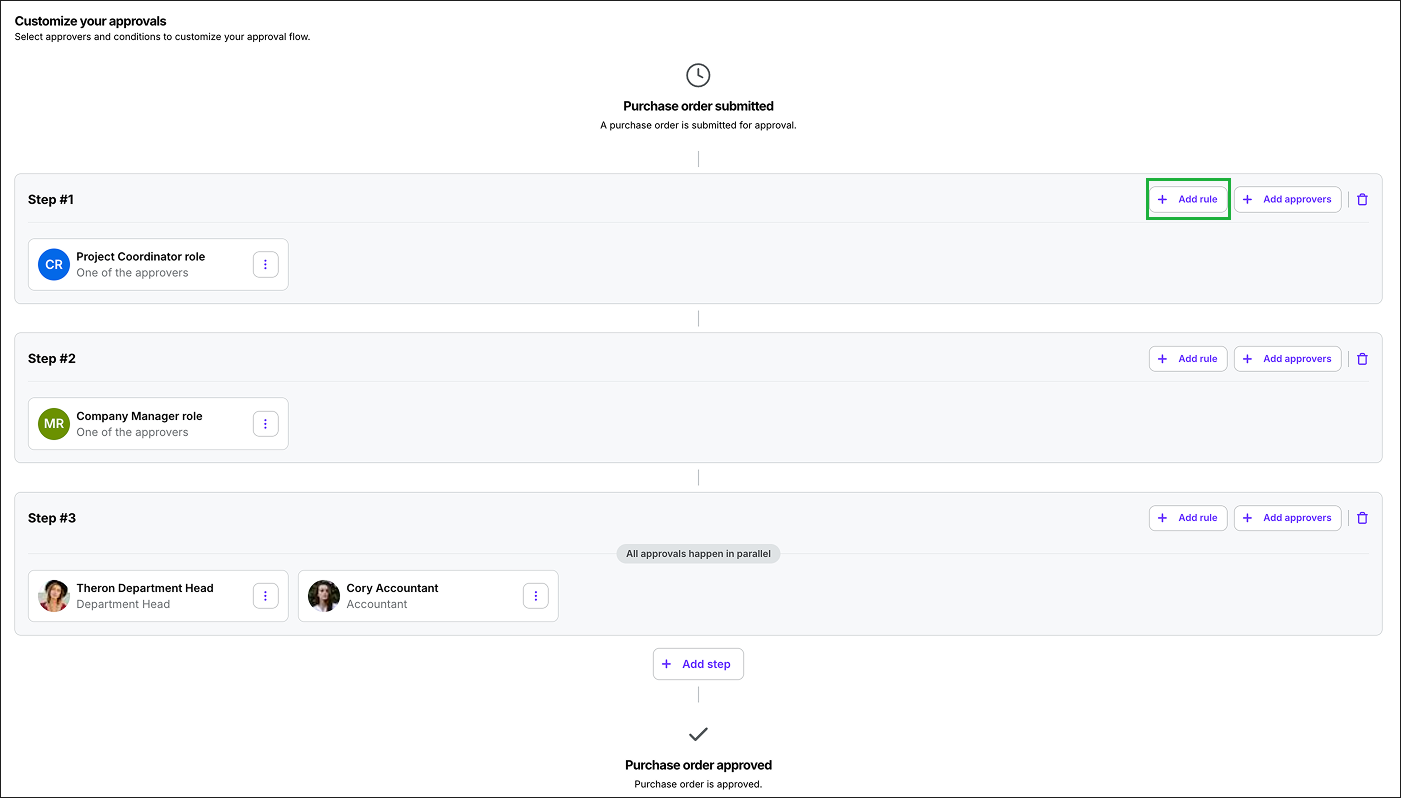
Click the + Add rule button
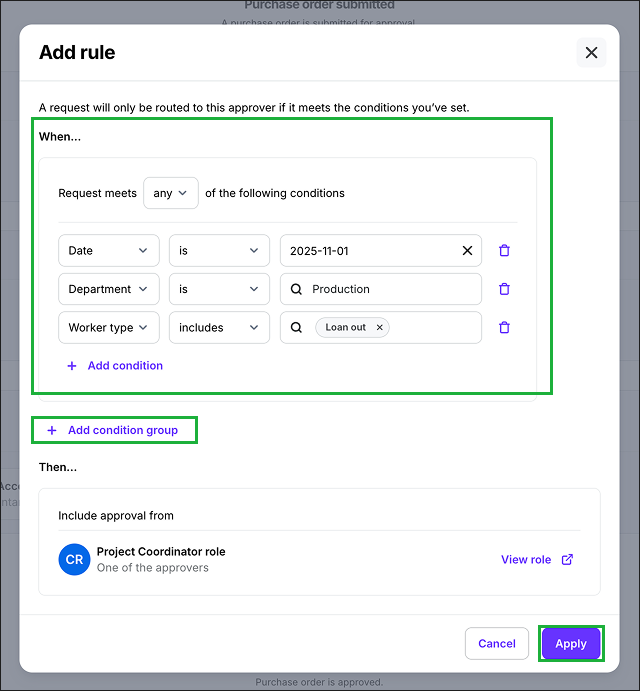
Example of a rule being setup for an approval workflow. Click any of the dropdown menus to make your selections. Click + Add condition group to add more conditions. When your ready, click the Apply button.
Rule conditions by approval workflow type
Conditions in approval workflow rules are the “if” statements that decide when a step needs approval. A condition compares fields on the item being approved to criteria you set. When the condition is true, the step is required; when it’s false, the step is skipped.
Startwork approval workflows
These rule conditions evaluate data from the hiring form and worker profile:
Worker type
Route workflow based on worker type: Employee, Contractor, or Loan‑out
Route based on if the worker has an assigned project department head
If no department is assigned, the rule evaluates to false
Allowances
Route workflow based on the cap amount
Route workflow based on amount
Route workflow based on the allowance category granted to the worker
Union
Route workflow based on worker’s union affiliation: DGA, IATSE, Non-Union, Non-Union (PHBP), Teamsters, SAG-AFTRA, WGA, AFM, CWA, or Basic Crafts
Project department
Route workflow based on the assigned department

When configuring startwork approval workflow rules, you’ll have the option to select from the conditions highlighted
Timecard approval workflows
These rule conditions evaluate timecard fields.
Worker type
Route workflow based on worker type: Employee, Contractor, or Loan‑out
Project department
Route based on the department the project workers have been assigned to
Union
Route workflow based on worker’s union affiliation: DGA, IATSE, Non-Union, Non-Union (PHBP), Teamsters, SAG-AFTRA, WGA, AFM, CWA, or Basic Crafts
PO approval workflows
These rule conditions evaluate purchase order fields.
Purchase order
Route workflow based: Date, Purchase order number, or Total
Project department
Route based on the department assigned to the PO
Project worker
Route based on the PO submitter’s worker type
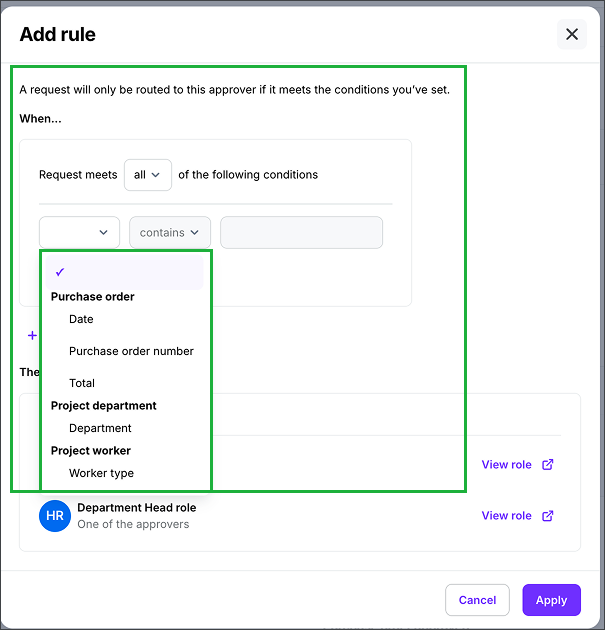
When configuring PO approval workflow rules, you’ll have the option to select from the conditions highlighted
Vendor payments approval workflows
These rule conditions evaluate vendor payments fields:
Payment batch project
Route workflow based on Project name
Payment group
Route workflow based on Payment method
Vendor
Route workflow based on the vendor’s Display name
Invoice
Route workflow based on the Payment date
Route workflow based on the Payment amount
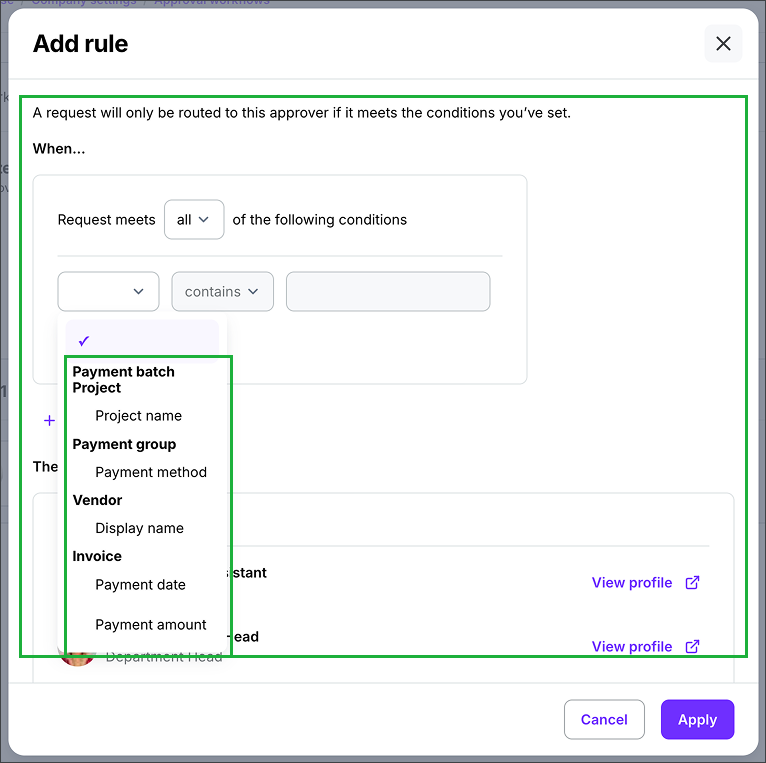
When configuring Vendor payments approval workflow rules, you’ll have the option to select from the conditions highlighted
Update or delete a rule for an approval workflow step
To change or delete an approval workflow rule:
Go to the company-level Approval workflow management page
Click the name of the approval workflow that you want to update rules for
On the Edit approval workflow page, scroll down to the Customize your approvals section and then click the Edit rule button in the Step that you want to update
In the Edit rule popup, you can click the dropdown menus and options to make your changes, or click Delete rule to remove it completely
When you’re done editing the rule for the approval workflow step, click the Apply button
Update or turn on/off an approval workflow
To change or turn on/off an approval workflow:
On the Approval workflows management page, click the Approval workflows tab
Click Edit next to the workflow
Update details, approvers, or steps as needed
To turn an approval workflow on or off, click the toggle Workflow enabled off
Click Save
Assign an approval workflow to a project
Remember, in order to use an approval workflow, it must first be created at the company level, and toggled on.
To assign an approval workflow to a project:
In the left-side navigation, click the dropdown menu and select the project that you want to assign an approval workflow to
In the left-side navigation, click Project settings
In the ADDITIONAL SETTINGS sub-menu, click Approval workflows
On the project’s Approval workflow management page, click the search bar to see the list of available approval workflows. Click to select the approval workflow(s) that you want to assign to the project.
Click the Save button
How to approve POs, Timecards, and Startwork in Wrapbook
Company team members that have been added to an approval workflow can access the items they need to review and approve from the project’s Approvals dashboard:
In the left-side navigation, click the dropdown menu and select the project that you want to approve items for
In the left-side navigation, click Approvals
On your Approvals dashboard, click the tab to see the list of items waiting for your approval: Purchase orders, Timecards, or Startwork. Note that you’ll only see the tabs and items that you have been authorized to approve.
Note:
Custom or uploaded startwork can be bulk approved
Wage Theft Prevention Act (WTPA) forms can be bulk approved
Government-issued forms (like W-4 or I-9) cannot be bulk approved due to compliance rules
Approval workflow notifications
Wrapbook notifies the right team members at the right time as approvals move through your workflow. Below is what to expect and how each notification works.
Notification channels
In‑app notification alert (bell icon)
Emails come from @wrapbook.com
Types of notifications
Approval requested (Immediate): Sent as soon as an approver is added to an approval step and the item enters their queue
Approval requested (Reminder): Follow‑up if an approval request is still pending after the initial notification
Approval requested (Digest): Scheduled batched summary of pending approvals instead of individual messages
Approval approved: Confirms that an approver approved the request
Approval denied: Confirms that an approver denied the request
Request sent back: Signals that a request was sent back to a prior step or approver for changes
Workflow comment added: Notifies participants when a comment is added on the approval thread
Startwork deal edited: Alerts relevant participants that a worker deal was edited during a startwork approval workflow