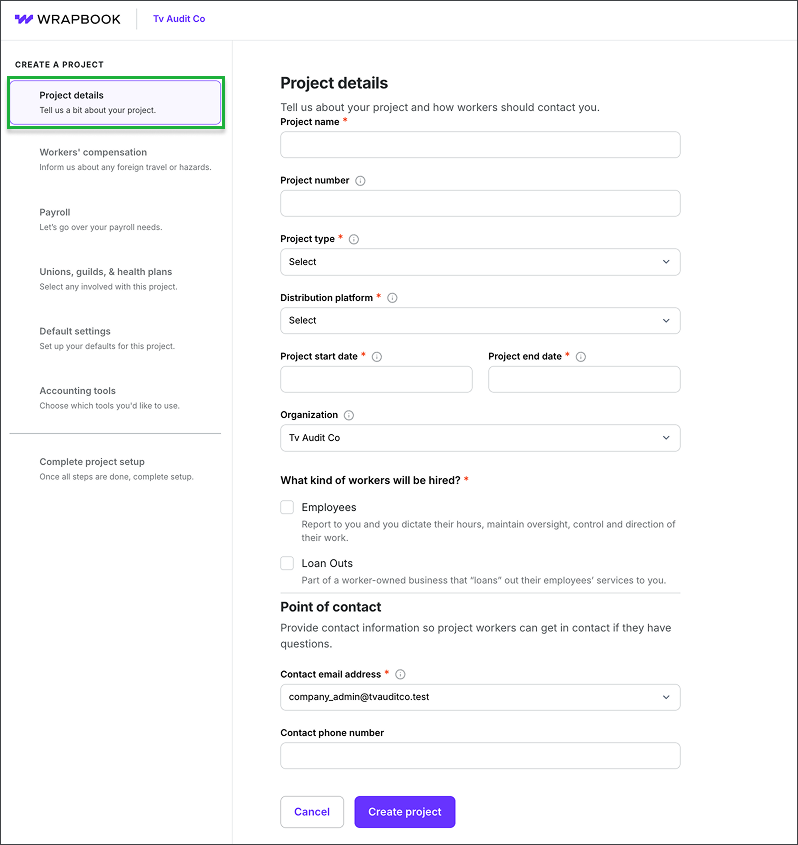
After you create the project, you’ll be prompted to add the Project Details. Once you enter these details, you can proceed to the next steps, or you can save your project as a Draft and complete project setup at a later time.
Project name
Enter a name for the project. This name will be shared with onboarded workers.
Project number (optional)
Enter an internal ID used for project tracking that’s specific to your production. This ID is not used by Wrapbook.
Project type
Click the dropdown menu to select the category that best represents your project: Production, Post-Production, Live Event, Photography, or Other
If you select Production or Post-Production, you’ll be prompted to enter the Production type: Commercial, Direct to Video, Feature Film, Live Broadcast, Movie of the Week, Music Video, New Media, TV/Episodic, or YouTube Series
Distribution platform
Click the dropdown menu to select where your project is being aired, broadcast, or shown: TV, Internet/Streaming services, Theater, Movie of the week, Video on demand, Social media, or Other
Selecting Other will create a new field called Other distribution platform where you can enter additional information
Project start date
Enter the start date for your project
If you’re using Wrapbook to provide required workers’ compensation insurance, your project’s start date cannot be more than two weeks old
If you need to backdate your project’s start to an earlier date, please contact the Support team
Project end date
Enter the last known date that project workers will be paid
Organization
Click the dropdown menu and select the organization saved to your Wrapbook account that should have access to the project and its reports
The choices in the dropdown menu are based on the Organizations that are listed in your Company settings
If you want to use an organization that isn’t available from the dropdown menu, click Company settings in the left-side navigation, and scroll down until you see the Permissions and Access Control section
Click the Manage button in the Organizations row to add information about the organization you’d like to use
Worker types
Click the checkboxes to identify the worker types for the project: Employees, Loan Outs, and/or Contractors
You’ll be prompted to enter additional details based on the worker types that you enable. Providing these details helps Wrapbook determine how to handle your workers' compensation application.
When you use Wrapbook to pay employees and loan outs, we provide worker's compensation insurance and, if it proves necessary, disburse payments as part of the cost of running payroll. You cannot add employees and loan outs to a project before a worker’s compensation application has been submitted. Employees and loan-outs cannot be removed once added.
Contractors can be added to a project with or without workers’ compensation. You can only remove contractors if none have been hired for the project.
If you select Contractors as a permitted worker type for a project, you won’t be able to change it. Wrapbook will not be able to provide workers’ compensation and your production company will be listed as the hiring party on their 1099 tax form.
Point of contact
Click the dropdown menu to select the main contact email address for the project. Worker questions will be directed to this email address.
The email addresses that appear in the dropdown menu are based on the people that are listed as Members in your Company settings
If you want to use an email address that isn’t available from the dropdown menu, click Company settings in the left-side navigation, scroll down the page until you see the Permissions and Access Control section, and click the Manage button next to Members
Once you’ve entered the required Project details, click the Create project button. At this point your project will be created and saved under Drafts on your All Projects dashboard. From here, you can continue setting up the project, or you can click the Finish setup later button.

Step 1: Project details